If you decide to connect your TV to a computer, or a laptop on Windows 10, now I will show you and tell you how to do it. We will connect in two ways: via a wireless Wi-Fi network, and using an HDMI cable. Under the Wi-Fi connection, I will enter the connection via a Wi-Fi router, and the DLNA technology setting. When from a computer, you can watch movies, photos, and listen to music on the TV. Well, connecting using an HDMI cable is a normal HDMI connection 🙂 With this connection, we will have a TV like a monitor in Windows 10.
Honestly, it doesn't make much difference whether you have Windows 7 or Windows 10. Connecting to a TV via HDMI or Wi-Fi is practically the same. But, let's take a look at the example of a laptop with Windows 10 installed. I think this article will be relevant and useful for a long time.
We connect the TV to a laptop (Windows 10) via Wi-Fi. DLNA setup
We will not consider setting up Wi-Fi Direct technology (when you can connect a TV to a laptop without a router, wirelessly) and Miracast (not all devices support this technology). These are topics for individual articles.
If you want to connect your TV to your computer wirelessly, you can do this as follows:
- Connect your laptop (Windows 10) to the router via Wi-Fi.
- Connect your TV to the same network. Here are instructions for connecting LG TVs, and instructions for setting up Wi-Fi on Philips TVs (Android TV).
The main thing is that the laptop and the TV are connected to the same router. By the way, not necessarily via Wi-Fi. One of the devices (or even both) can be connected to the router via cable.
After you connect everything, you can proceed to setting up the DLNA server on your computer. By running the server on your computer, you can watch movies on your TV. Please note that the TV will not display the desktop when using this method. You will only be able to view certain files. On setting up a DLNA server, we have three articles:
- DLNA server in Windows 10. Setting up, output to TV - in this article we started the server without third-party programs, using standard tools in Windows 10.
- DLNA server setup for Philips TV. Watching movies from computer on TV
- How to watch movies from a computer on an LG TV (via wi-fi, or a network)? DLNA setup via Smart Share
Despite the fact that they are written on the example of Windows 7, on Windows 10 the DLNA server setup will be the same. I checked that a DLNA server running on a laptop with Windows 10 installed is displayed on the TV without problems.
I have instructions on the links above for LG and Philips TVs. But, the server launched by the above methods will work without problems on other TVs: Samsung, Sony, Toshiba, etc. Configure DLNA using the "Home Media Server (UPnP, DLNA, HTTP)" program (as I did in (See article for Philips TV). It can be called universal.
With the wireless connection, I think sorted out. Moving on to the wires.
HDMI connection in Winodows 10
If you have Windows 7, see this guide on how to connect your LG TV to your computer via HDMI.
We take a regular HDMI cable. We connect one end of the cable to the TV in the HDMI connector. There can be several of them, connect to any one.

We connect the other end of the cable to a laptop or stationary computer.

If the picture from the computer does not appear on the TV, then most likely, you need to select the signal source on the TV. The remote control must have a dedicated button. Usually, it is signed with INPUT, or SOURCES. Click on it, and select the HDMI connector to which we connected the cable as a source.

An image should appear on the TV.

In Windows 10, you can control the second screen. In our case, this is a TV. In the top ten this is called "Projection". To call this menu, just press the key combination Win + P... A menu will appear on the right where you can choose one of 4 options.

For example, you can display the image only on the TV.

Here are all the settings.
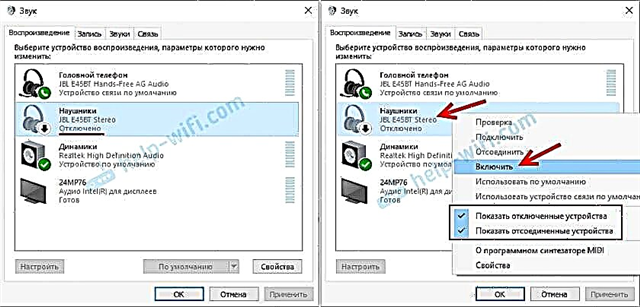
If the sound on the TV does not work when connected to Windows 10 via HDMI
Perhaps, after connecting the TV to the computer, the sound will not play from the TV speakers, but from the laptop speakers, or the connected speakers. This can be easily fixed.
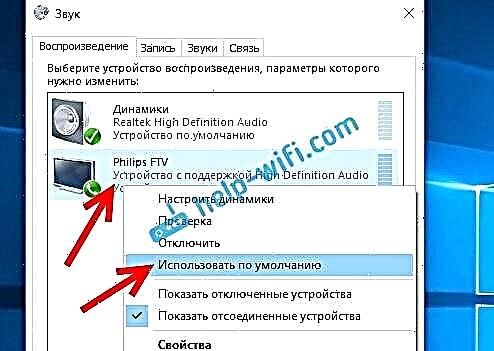
Right-click on the volume control icon in the notification bar and select Playback devices.

Your TV should be on the list. Click on it with the right mouse button, and select Use as default.

The sound will now be heard from your TV speakers.