This article will be useful to everyone who distributes Wi-Fi from their laptops or desktop computers. If you start a virtual network with a command through the command line, then you probably know that after each reboot of the laptop (turning off and on), you need to re-enter the command line and execute the appropriate command. Only after that, the laptop starts distributing Wi-Fi.
Even if you set up an access point through some program, then all you need to do is run this program, and then start the virtual network. This is not always convenient. Especially if you use this feature a lot. It is much more convenient when the access point will start automatically, immediately after Windows starts. I will show you how to do this and explain everything in detail.
In one of the articles on setting up a Wi-Fi hotspot on a laptop, I talked about how to create .bat files to start and stop a virtual Wi-Fi network. So, we will create a .bat in the same way with the command to start the network, and just add it to autoload. When you turn on the computer, it will automatically start and execute the command. After that, the laptop will distribute the Internet without your participation. The task is clear, let's go!
Create a .bat file to run a Wi-Fi hotspot on a laptop
This method works for Windows 10, Windows 8 (8.1), and Windows 7.
Before creating such a file, you must have an access point configured. How to do this, I wrote in the instructions:
- How to share Wi-Fi from a laptop on Windows 10?
- How to distribute the Internet via Wi-Fi from a laptop on Windows 7?
Only after everything can be started manually, and the computer will distribute the Internet, it makes sense to create a file for startup.
On the desktop, right-click on an empty area, and select "New" - "Text Document".

Rename the file to start_wifi.bat... The name can be anything (in English letters), the main thing is that the extension is.bat... After renaming, the file should be different.
If it doesn't work, you may have disabled the display of file extensions. Read here how to fix it.
After that, right-click on the file and select "Modify".

A regular notepad will open. Paste the command into it:
netsh wlan start hostednetwork
Click on "File" - "Save", or simply close the file and confirm saving the changes.

That's it, our file is ready. Now, if you start it, the virtual Wi-Fi network will start. In order for this file to automatically start when the computer is turned on, we need to add it to startup. What we will do now.
If necessary, you can create the same file to stop sharing Wi-Fi. Everything is exactly the same, only the command will be different:netsh wlan stop hostednetwork.
Add .bat file to Windows 10 startup to automatically start virtual Wi-Fi network
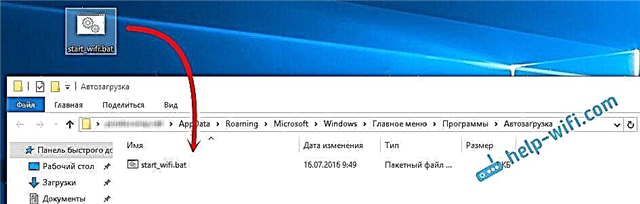
We need to copy the .bat file itself to the startup folder. To quickly open this folder in Windows 10, press the keyboard shortcut Win + R, enter the command in the Run windowshell: startup, and click Ok.

This will open the startup folder, into which we need to copy our .bat file.

We reboot the computer and enjoy the result. Immediately after Windows boots up, you will notice how a command prompt window appears and quickly disappears. This means that the access point is running.
Automatic start of access point in Windows 7
In Windows 7, the Startup folder can be found in the Start menu - All Programs.

Open the folder and copy our .bat file into it.

Everything is ready. To remove a file from startup, just delete it.