Windows 10 assigns each Wi-Fi or Ethernet network the status of a private (aka home) or public (public) network. Depending on the assigned network profile, the default settings for a specific connection (network) are changed. There are entered settings for sharing files and printers. Which determines whether other devices will see your computer on the local network.
When we first connect to a Wi-Fi network, or connect to the Internet via a network cable, Windows 10 asks us: "Do you want to allow other computers and devices on this network to detect your PC?"

If you select "Yes", the system will assign this network the status of home. And if you choose "No" (or choose nothing), the "Public" network profile will be assigned.
You can view the current network status in the Network and Sharing Center.

In the settings, you can always change the public network to your home network, and vice versa. But let's first find out what the difference is, what the network status affects, and what problems can be if the network location is incorrectly set.
What is the difference between home and public network?
As I wrote above, the difference is in the sharing settings that are applied to the network by default after assigning a network profile to it. It's simple:
- Private network, or home - the computer will be discovered on the network by other devices and will be available to share files and printers. Of course, it is recommended to assign this network profile to a Wi-Fi network, or an Ethernet connection, only when you trust the network itself. For example, they are connected to their home network, at work, etc. And if there is a need for the computer to participate in the local network.
- The public network, or public, is the opposite. For this profile, the default settings are set so that your computer will not participate in the local network. It will not be detected by other devices on the network and will be maximally protected. When we connect to open, unknown Wi-Fi networks, or even directly via a network cable from a provider, it is recommended to set this particular network profile.
Sharing settings can be changed separately for each profile. Or for all networks at once. This can be done in the control panel. At: Control Panel All Control Panel Items Network and Sharing Center Advanced Sharing Options

These settings can be useful for example when setting up a local network. But it is better not to change the parameters unless necessary. Especially in the "All networks" and "Guest or Public" section.
By the way, take a look at the screenshot above. Next to the profile that is selected for the network to which you are currently connected, there will be an inscription "current profile". These are the parameters of the network profiles. And we have an article on a slightly different topic. Now I'll show you how to change from a public network to a private one and vice versa in Windows 10.
Which network profile should you choose?
If you have Internet connected via cable from your home router, you can select the "Private" profile. And if the Internet is connected directly from the ISP, it is better to set "Public".
As for Wi-Fi networks, everything is simple here. If you trust the network (at home, at work, with friends), then you can choose "Private". And if the network is somewhere in a cafe, hotel, store, etc., then of course we prohibit general access by selecting the "Public" profile.
Change your profile from public to private (or vice versa) in Windows 10
There are several ways you can change the network type. Let's start with the simplest one. This method is suitable for both Wi-Fi networks and Ethernet connections.
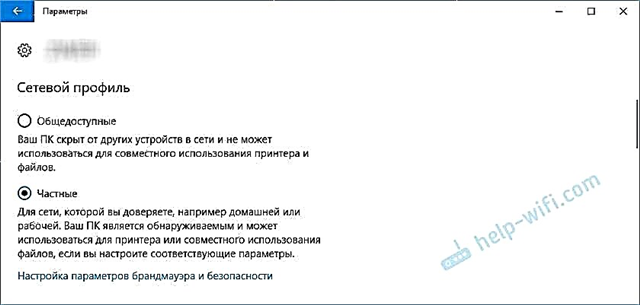
Open the parameters, then go to the "Network and Internet" section. On the "Status" tab, click on "Change connection properties".

And we just change the network profile to the required one.

Everything is ready.
How to change the network profile of a Wi-Fi network?
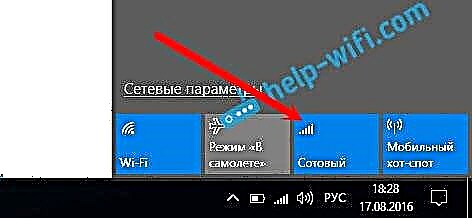
You can get to the settings faster. Click on the connection icon and select "Network and Internet Settings".

Next, go to the "Wi-Fi" tab and select the Wi-Fi network to which you are connected.

Change your network location.

Once configured, the computer will either be available on the network or hidden.
Configuring Network Location for Ethernet Connection in Windows 10
As I wrote at the beginning of the article, for an Ethernet connection (via a network cable), you can also change the network location from "Public network" to "Home network". And in the reverse order.
In the same way, go to the parameters and in the "Network and Internet" section, open the "Ethernet" tab. Click on a connection to open its settings.

It remains only to select the required profile.

Instead of configuring a network profile, there might be a "Make this computer discoverable" option. If you put the switch in the "Off" position, the computer will not be found on the network (Public Network). And if you put "On", then the "Private network" profile will be applied.
Some nuances
Not infrequently, due to an incorrectly selected network profile, it is not possible, for example, to set up watching movies on a TV using DLNA technology. Since the TV simply does not see the computer on the network due to the "Public" profile installed. Or, you can't set up file and printer sharing. Therefore, in the network where you plan to exchange files, access media content from other devices, you need to activate the "Private" profile and configure it if necessary.
For your safety, always prevent other computers from discovering your computer on the network if you do not trust the network and cannot be sure of its security. Just activate the "Public" profile, or click "No" in response to the question that appears immediately when you connect to the network.