I don't even know what could be simpler than setting up a modern router. TP-Link Archer A7 is no exception. The developers at TP-Link did their best and made a multilingual, beautiful and understandable web interface, an application for mobile devices, and even printed instructions with pictures for quick setup and put them in a box with a router. But despite this, it is not uncommon for users to still have certain difficulties in the configuration process. And most often these difficulties are associated with the device from which the configuration is performed, or with the Internet provider. But this is already a topic for another article. And today we will look at the process of setting up TP-Link Archer A7. We will connect everything and quickly set up. And if you don't have Archer A7 yet, then read my review of this model.
And immediately get down to business. First you need to connect everything correctly, connect and not confuse anything. We connect the power adapter to the router itself and plug it into a power outlet (make sure the power on the router is turned on with the Power On / Off button). We connect the Internet to the Internet port (it is blue) (a cable from an Internet provider, DSL / GPoN modem, another router).

The next step is to connect the device from which we will configure it to TP-Link Archer A7. It can be a PC, laptop, smartphone, tablet. If you have the ability to connect from a PC or laptop, it is best to do so with a network cable.

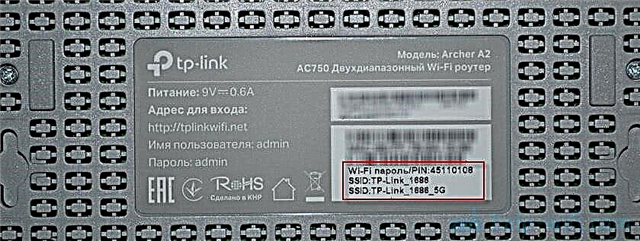
If you need to connect via Wi-Fi, then in the list of available Wi-Fi networks on your device, find the router's network and select it. Enter the factory password. The factory network name (SSID) and password are indicated on a sticker on the bottom of the router and on a separate card that comes with the router (on which you can write down a new password after setting up).

Let me remind you that you can set up a router from a smartphone or tablet through the Tether application. We installed the application, connected to the Wi-Fi network of the router and set up through the application.
If you want to configure via the web interface (through a browser), then I will show you how to enter the settings and specify the necessary parameters.
Setting up TP-Link Archer A7
Open any browser and go to the address http://tplinkwifi.net/ (more in this article). Or see the instructions on how to enter the settings of the TP-Link router. By the way, you can also get into the web interface by using the IP address 192.168.0.1.
The router will immediately ask us to set an administrator password. Come up with a password, enter it twice and immediately write it down somewhere. You will need it later to enter the router settings.

After clicking the Get Started button, the Quick Setup Wizard will open. Usually, I show you how to configure a router using it, but today we will make the necessary settings separately, in different sections of the web interface. Therefore, we immediately go to the "Additional settings" section.

If you like, you can try setting up the Archer A7 through the quick setup wizard. Everything is very simple, step by step.
Internet connection
Important: if the Internet through your TP-Link Archer A7 is already working, the connected devices have access to the Internet, then you can skip this setup step (go straight to the Wi-Fi setup).
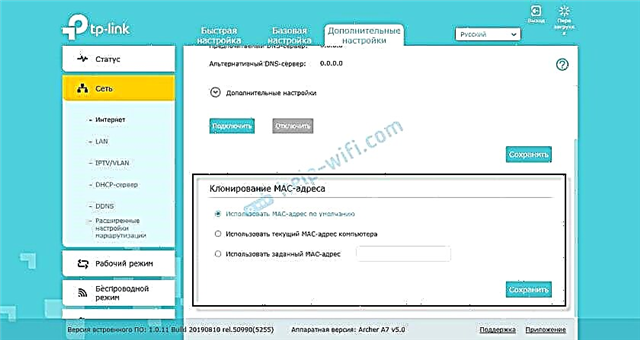
On the "Additional settings" tab, open the "Network" - "Internet" section. It is very important to choose the right type of connection and set all the necessary parameters. The information that needs to be specified on this page is provided by your Internet service provider. Therefore, if you do not know what type of connection your provider uses, call support, or see the agreement on connecting to the Internet.
If you have Dynamic IP (DHCP), then just select this type of connection and save the settings.

If PPPoE, PPTP, L2TP, then you need to specify the username and password. As well as the server address (only for PPTP and L2TP).

If the provider binds by MAC address, then you can either clone the MAC address from the computer to which the Internet is connected, or register the desired MAC address manually, or register the MAC address of your TP-Link Archer A7 (indicated on the bottom of the sticker) from the provider.

Once again: all the information on setting up an Internet connection you can find out from the support of your Internet provider.
It is important that at this stage of the configuration, the Internet through the router works. Otherwise, there is no point in continuing to configure.
Related article: When setting up a router, writes Without access to the Internet, or Limited and there is no Internet connection
Wi-Fi network setup
Many people leave the name of the Wi-Fi network and the default password. But I still recommend changing them. At least a password. To do this, go to the "Wireless Mode" - "Wireless Settings" section.
First, we change the network name and password for the Wi-Fi network in the 2.4 GHz range.

Click on the save button and do the same for the 5 GHz network.

Don't forget to save your settings! I also recommend writing down the password for the Wi-Fi network.
Importantly, after changing the network name and / or password, you need to reconnect your devices to the new Wi-Fi network.
The basic configuration of the router is complete! You can connect your devices and check TP-Link Archer A7 in operation.
How to update TP-Link Archer A7 firmware?
Many people are interested in the issue of software updates. That's right, you need to update the firmware. Moreover, there are always updates for new models. The manufacturer finalizes the software, adds some functions, eliminates errors, etc.
Archer A7 is able to independently download and install new software versions. To do this, open the "System Tools" - "Firmware Update" section. The current version of the firmware and the hardware version of the router will be indicated there (useful when downloading the firmware from the TP-Link website).
To check, click on the "Check for Updates" button.

If the message "Your firmware version does not require updating" appears, then there is no new version. If a new firmware is found, the router will offer to install it.
You can also download the firmware file for the Archer A7 from TP-Link website and update it manually. Click on the "Browse" button, select the firmware file and click "Update". Only download the firmware strictly for your model, hardware version and regional version of the router (RU - EU / US). This information can be found on the sticker on the bottom of the router and on the box.
USB port on TP-Link Archer A7
The USB port on this router can be used to connect USB storage devices and printers. And the version (RU) supports USB modems. This means that a 3G / 4G modem can be connected to TP-Link Archer A7 and it will be used to access the Internet.
Connection via USB modem can be configured in the section "USB Settings" - "3G / 4G". If the router is compatible with your modem, then it must be determined (at the time of this writing, I did not find a list of compatible modems for the Archer A7 on the TP-Link website). Then you just need to select the country and your operator from the list. The settings will be configured automatically.

In the same section "USB Settings" there are settings for the print server (as far as I understand, only in the EU / US version), settings for sharing a USB drive, and settings for the "Download offline" function, which I wrote about in this article: setting up an offline download files on the TP-Link router.
Resetting the Archer A7 router settings
And in conclusion, I want to show how to reset the TP-Link Archer A7 router to factory settings. For example, when you want to configure the router again, change the provider, or forget the administrator password.
Turn on the router and wait until it boots up (about 2 minutes). Then press the button with something sharp Reset and hold it for about 5 seconds.

When the "Power" light starts flashing, you can release the button. The router will reboot and the settings will be reset to factory defaults.