In this article, we will set up a media server (DLNA) on a computer for a Philips TV. After setting up, you can watch movies, photos, and listen to music on your TV on your computer (laptop). All of this is DLNA technology. This means that the TV can be connected to a computer via Wi-Fi. More precisely, the computer and TV must be connected to the same Wi-Fi router. By network cable, or wireless network.
I will explain in more detail. You have a Philips TV (in this article, we will talk specifically about these TVs), with DLNA support (if there is a Smart TV, then there is definitely DLNA support). Your TV is connected to a Wi-Fi router (via Wi-Fi, or using a cable). Also, a computer is connected to this router. We launch a DLNA server on a computer, open the necessary folders with video, photos, or music, and simply start viewing on the TV. Everything is by air, no wires. It is very convenient, you do not need to record movies on a USB flash drive all the time. We just get access to the computer, select the desired movie and watch.
In the way described below, you can run a DLNA server on Windows 7, Windows 8, and even Windows 10. To start and manage the server, we will use the free, just excellent program "Home Media Server (UPnP, DLNA, HTTP)". I recently showed you how to set up DLNA on an LG TV, so there we started the server using a proprietary program. Since Philips does not have such a program, we will use the "Home Media Server". The program is really very simple and cool.
We need:
- Philips TV with DLNA support. The TV must be connected to the router via Wi-Fi, or via a network cable. I will show on the example of Philips 43PUS7150 / 12 with Smart TV (Android TV).
- A computer that is connected to the same router as the TV. It can also be connected via Wi-Fi network, or LAN.
- Home Media Server (UPnP, DLNA, HTTP) software for DLNA server setup.
In fact, a server launched in this way will be able to see absolutely any TV: Philips, Sony, LG, Samsung, etc. Sony, by the way, already has models on Android TV. So, the instructions for them should also work. Except that the access may differ before viewing the DLNA server content on the TV itself.
Setting up a DLNA server for your TV with the "Home Media Server" program
First, download and install the Home Media Server (UPnP, DLNA, HTTP) program. I recommend downloading it from the official website: https://www.homemediaserver.ru/index.htm. Click the button Download opposite the EXE version. The file size is approximately 35 MB.

Save the file, then run it, and follow the instructions to install the program.
Start the program with a shortcut on the desktop, or from the Start menu. First of all, we need to configure access to files on the computer. We can only open certain folders for the TV, all local drives, or even removable media.
In the program window, click on the top button Settings... We are interested in the first tab Media Resources. There will already be three folders open. These are standard. To open access to all local drives on your computer, check the box next to Local drives... To open access to removable drives, check the box next to Removable disks.

If you want to open, for example, only one local disk or folder, then do not check these boxes, but click on the button Add to... And in the explorer, select the drive or folder that you want to open for viewing on TV. The folder appears in the list. You can delete folders by simply highlighting it and clicking Delete.

I think the meaning is clear. You can open only one folder, which contains, for example, your movies. And you can open all the disks. I advise you to check the box next to Local drives. Then, the TV will display the My Computer folder, in which you can view all the files.
At this point, the setting can be completed by pressing the button Ok... If you want, you can also go to the side tab Server, and change the name of your DLNA server. It will be displayed on the TV.

Click the button Okto exit the settings.
To start DLNA server, press the button Running.

If your TV is turned on and connected to the router, then in the program window, by opening the tabPlayback Devices (DMR), you will see your TV. This means that everything is fine. If the TV does not appear, check the connection and see the tips at the end of this article.

The program can be minimized. You can proceed to DLNA setup on your TV.
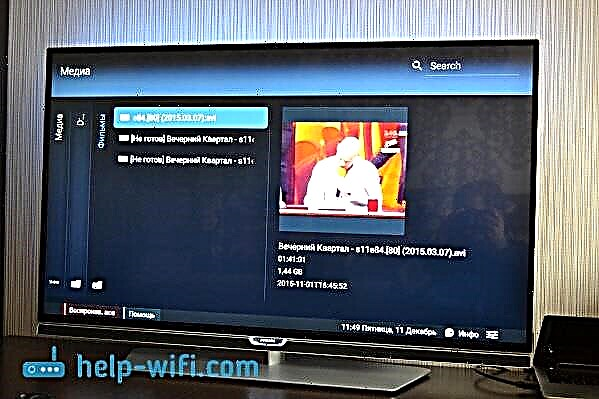
Watching DLNA Movies on a Philips TV from a Computer
Press the button on the remote control SOURCES.

On the menu Sources choose Network (media)... Or run the program Media from the Android TV menu.

Select the server running on the computer from the list.

If you have opened all local drives, then you will have a My Computer folder. Select it, all disks will be there. You can open the folders you need, and start watching movies, photos, or playing music from them. If you open one of the standard folders: Movies, Photos, or Music, then all available content will be there, sorted into different categories. To view content by folder, select Media Resource Directories.

Select a folder with your movies, and just start viewing the desired file.

That's the whole setup. From the TV we got full access to videos, photos and music that is on your computer. The program "Home Media Server (UPnP, DLNA, HTTP)" will prevent your computer from falling asleep and interrupt the movie playback. You can also control the viewing from the program itself on the computer. There are a lot of settings and possibilities, I think you can figure it out.
Why is the DLNA server not displayed on the TV (files)
The most common problem when setting up such a scheme is the lack of a running server on the TV. When the files from the computer are just not displayed.
In such situations, the first thing to do is always check the Wi-Fi connection of the TV and laptop, or the cable connection. Perhaps one of the devices just turned off. Turn your TV off and on. You can also restart your computer and start the server again. You can also try disabling the antivirus, which can block the TV connection.
If a DLNA movie plays with delays, it is buggy
In such cases, you most likely started watching a very difficult movie. And the router does not cope with the transfer of information. Usually, this problem appears on cheap routers, and when connected via Wi-Fi. Large movies, in high quality, which do not want to be played via DLNA, are best watched from a USB drive or hard drive.
If, when opening a video, the TV says "Format is not supported"
There are times when the TV does not want to play a video file. Most likely, the standard player simply does not support the format, there is no codec. In this case, if you have an Android TV, then you can install the VLC player from the Google Play Store. He also knows how to play files from the local network. And most likely, it will play videos that were not opened with a standard player.