I noticed that many are interested in the issue of choosing a free Wi-Fi network channel and changing this channel in the router settings. This is not strange, because of the channel, or rather, due to the fact that interference appears on the channel, many problems arise in the operation of the Internet via Wi-Fi. Frequent interruptions in the Wi-Fi connection, low connection speed, unstable work, etc. All this may be due to the fact that other networks start working on the channel on which your network operates and it turns out that the channel is very busy.
And also, if your device simply does not see the Wi-Fi network, but other networks see it and other devices see this network, then this may also be due to the settings of the wireless network channel. Now I will tell you why this is happening, how to find a free channel and change it in the settings of your router. Consider the most popular routers from manufacturers such as Tp-Link, D-Link, Asus, Zyxel and Tenda.
What is a Wi-Fi network channel and why change it?
To better understand the situation, let's first figure out what's what. At the moment, almost all routers broadcast a wireless network at a frequency2.4 GHz... There are already new ones that operate at a frequency5 GHz, but there are still few of them. They are expensive, and not everyone is ready to throw out their router and buy a new one, so that only the network is at a frequency of 5 GHz. This is clear. So, at a frequency of 2.4 GHz, in Ukraine and Russia it is allowed to use from the 1st to the 13th channel. This means that each Wi-Fi network operates on channel 1 through 13. In America, for example, only 11 channels are allowed. Because of this, by the way, there are problems when connecting to wireless networks devices that were brought from America. They just don't see Wi-Fi that runs on channel 12 or 13.
As a rule, problems begin when two (and maybe more) Wi-Fi networks get on the same channel. If you live in a private house, then you most likely will not have other networks within the range of your Wi-Fi, and if they do, there will be few of them, and the signal is weak. But in the apartment, there may be a lot of networks. And they very often get on the same channel. Why? I'll explain now. For example, you set up your router and select a static channel in the settings, let it be the 6th one. Your neighbor sets up the router and also puts the 6th channel.

By default, in the settings of the router there is an automatic channel selection mode. This means that when the router turns on, it selects a free channel (or less loaded) for itself. We reboot it, and it can already select another channel. I don't know if this thing works, but I think that even with automatic selection, several networks can appear on 1 channel. Especially if there are a lot of networks. They just have nowhere to go.
To be honest, I strongly support her idea of setting up a static channel. I think that everything should work well in auto mode. If there are any problems, then you can restart the router and it will choose a different channel. And if you forcibly install, say, the 1st channel, which is still chosen by several people, then nothing good will come of it. There are programs that show on which channel all available networks work, we will now consider them.
I think this: if you have any problems with the Internet via Wi-Fi, then just restart your router. It can be done several times. If the problem persists, then set some kind of static channel in the settings of your router (first try 1.6 and 11). Select any channel. And if it was static, then select the auto mode. You can try changing several static channels. This should help.
If nothing good came of it, or you have a desire, then you can use the program inSSIDer, or WiFiInfoView to search for a free channel. But, do not also forget that problems can arise not only due to interference on the channel. And for example, due to problems with the power of the router, interference from other devices, or failure of other components of the router.
How to find a free channel with inSSIDer, or WiFiInfoView?
If you open the list of free networks on your device (laptop, smartphone, tablet) and see a lot of networks available for connection, then it is best to use special programs to find a free channel for your network. The most popular of course is inSSIDer. It is free, the interface is in English, but everything is clear there. I also really liked the free, simple and small WiFiInfoView program (I advise you to use it). Now I will show you how to use these programs.
Channel search in inSSIDer program
First we need to download inSSIDer. You can find it on the Internet, or download the archive with the program from this link (home version 3.0.3.53 for Windows 7 and Windows 8). To install the program, just run the installation file from the archive and follow the instructions. After installation, run inSSIDer (the shortcut will be on the desktop). If I am not mistaken, then this program can also be installed on a tablet or phone that runs on Android / iOS. Search the branded app stores.
For these two programs to work, you must have Wi-Fi enabled. The device should see available networks. I wrote about setting up Wi-Fi on a laptop in this article.
We launch inSSIDer, and immediately go to the tab NETWORKS... You will immediately see in the table all available Wi-Fi networks and your network. If you are connected to it, an asterisk will be displayed next to it.
We need to look at the Channel tab more precisely at the information that is displayed below it. It shows which channel each network is using.
We look and choose the freest channel for our network. By the way, I forgot to write: there are three channels that never intersect... These are 1, 6, and 11, if they are not busy according to the program, then first of all try to install them. If the network operates on channel 10, for example, then it captures two more channels on each side. For example: 8.9,10, 11.12. You may ask why the program displays two channels opposite almost every network. 1 + 5, 13 + 9, etc. They write that this is because one channel is set manually, and the second chooses a router for better coverage. I myself could not understand, but I checked it, and I understood why two channels are displayed. This is due to the 40MHz channel width selected in the router settings. Or, there is an automatic selection, and he set 40MHz. If you force to set 20MHz, then the channel will be displayed alone. Checked.
Channel selection using WiFiInfoView program
WiFiInfoView is a very lightweight program that doesn't even require installation. Yes, it displays less information about networks than inSSIDer, but in it you can see what we need, which channel is not very busy, or not at all busy. You can download the program at this link. Just open the archive and run the fileWifiInfoView.exe... The program will start immediately. In columnChannel we can observe the channel of each network.

Then, just like in the case with the inSSIDer program, we look at all the busy channels and choose the freest one for ourselves. It also needs to be specified in the router settings. Now we will see how to establish a static Wi-Fi network channel on the router.
Be careful with setting the 12th and 13th channels. After installing them, some of your devices may simply stop seeing the network.
How can I change the Wi-Fi network channel on the Tp-Link router?
If you have Tp-Link, then the channel changes as follows:
- We connect to the router via Wi-Fi, or cable.
- Open the browser and go to the address 192.168.1.1... If it doesn't work, then try192.168.0.1.
- You will be prompted for a username and password. If you changed them, then indicate yours. By default it is admin and admin.
In the settings go to the tabWireless - Wireless Settings (Wireless - Wireless Settings). Opposite pointChannel (Channel) select one of 13 static channels. But first you need to check if your region is set correctly in paragraphRegion on the same page.

Save the settings by clicking on the button Save... Reboot the router and test the network.
Change channel to D-Link
Here everything is about the same. We connect to our network and go to the settings. In your browser, go to 192.168.0.1 and provide a username and password. By default also admin and admin... If something does not work out, then see the detailed instructions for entering the settings.
In the settings go to the tab Wi-Fi... On the contrary Region choose the country where you live, but opposite Channel select the static channel we need. Push the button Apply.
 By the way, you noticed how cool everything is done with D-Link routers. The channel that is currently in use is displayed there. And when you select a channel, opposite each one displays how loaded it is. If you change the channel to D-Link, then there is even no need for the programs that we have considered above. Everything is clear and intuitive here. I think it displays the correct information.
How to change the Wi-Fi network channel on the Asus router?
It's just as easy on these routers. We connect (if not already connected), go to the settings by opening the address in the browser 192.168.1.1 and specify the username and login. The default is the same admin and admin... Or see detailed instructions.
Go to the tab Wireless network, specify the channel, and click Apply.

The router will reboot itself.
Changing Channel on Zyxel Keenetic routers
We connect to our Zyxel, open the browser and type in the address 192.168.1.1... Go to it and specify the username (admin by default) and password (1234 by default). Perhaps you will still need detailed instructions on accessing the control panel on ZyXEL Keenetic.
In the settings, open the tab Wi-Fi network, check if the country is selected correctly, and set the channel.

Don't forget to apply the settings.
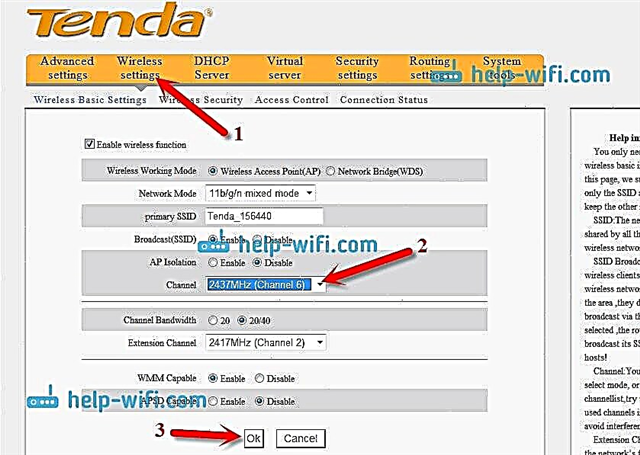
Specifying a static channel on a Tenda router
On Tenda routers, access to the settings opens at192.168.0.1... The default username is admin... Leave the "password" field blank. If you changed this data to enter the settings, then enter your own.
In the settings, open the tabWireless settings... In fieldChannel select the desired value.

Save the settings by clicking on ok.
Afterword
I know of a case when, due to a very large number of neighboring Wi-Fi networks, it was impossible to configure the router. More precisely, it was impossible to use the Internet via Wi-Fi, which they just did not do. As a rule, in such cases, the purchase of a new router that can broadcast the network at a frequency of 5 GHz saves. There the channels are definitely not busy.
I hope the article turned out to be informative and understandable. And you were able to find a free channel and change it. If you tested the operation on several channels, and the problem with the wireless network remains, then there may be other reasons. Describe everything in detail in the comments, we will try to figure it out.