In this article, we will configure a local network between two or more computers with Windows 7 (Windows 8) installed, which are connected via a Wi-Fi router. In fact, setting up a local network in Windows 7, Windows 8, and Windows 10 is almost the same. Windows XP only has its own nuances, there are always some problems when setting up a network between the seven and XP. But, about this in a separate article, and it's time to switch from Windows XP, it is outdated.
It is clear that in order to configure a local network and share files, computers need to be connected somehow to each other. This can be done with a network cable, I have a direct connection between two computers. But, it is much more interesting to connect all computers through a router, which is now installed in almost every home and office. When connecting via a router, you can already set up a local network not only between two computers. All computers, and even mobile devices that are connected to one router, can be connected to a local network
For example, stationary computers can be connected to a router via a network cable, and laptops - via a Wi-Fi network. This is how it is more convenient for you, and how you do it. It doesn't matter if the computer is connected to the router via Wi-Fi or a cable, the local network will work. And it doesn't matter what operating system you have installed, but I will show you using Windows 7 as an example.
And I will configure and show the network through the Asus RT-N18U router, to which my laptop is connected via Wi-Fi, and a stationary computer. Both work on Windows 7. It is between these two computers that we will now set up a local network. And also, let's open shared access to folders and files. What is a local network between computers for? Mostly for file sharing. If you often need to transfer some files from one computer to another, then in order not to run with a flash drive, you can do this over the network. Well, you can play games over the network.
If your network still has a TV with Smart TV, then you can set up access to movies on your computer from the TV. Read more in this article.
Instructions for setting up a local network in Windows 7
Let me remind you that the computers that you want to network must be connected to the same router, or directly connected by cable. Also, all the actions that I will show in this section must be performed on both computers.
An important point! If you want to set up a network via a Wi-Fi router to which some third-party devices are connected (for example, your neighbor), then after setting up, he will be able to access those folders on your computer that you will configure public access to. Set a good password on your Wi-Fi network to protect your network. If you still need to connect third-party devices to your router, but you want to set up a home network, then you can create a "guest network" for guests, as we did on the Zyxel router in this article.
One more point. If you set up a network when connecting computers directly, without a router, then you will also need to set static IP addresses in the properties of the local network connection. If you have a connection through a router, then you do not need to do anything else, continue to follow the instructions.
1First of all, we need to check that all computers work in the same workgroup. This should be checked on all computers that will be connected to the local network.
We do this: press the key combinationWin + R, and in the window that appears, specify the commandsysdm.cpl... Push Ok.

On the contrary Working groupis likely to be written WORKGROUP... You can leave her. The main thing is that on the other computers the workgroup should also be WORKGROUP.

If you go to change it, for example on MSHOME, then press the button Edit, and specify a new group. Save changes and restart your computer.
2The second step is to change the sharing settings. We perform these settings in the same way on all computers in the network. Now I'll show you what to enable.
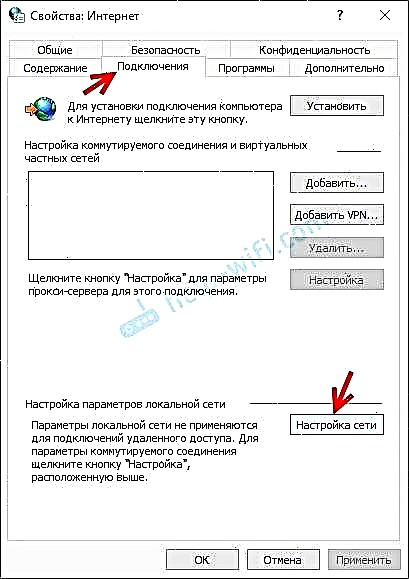
Right click on the internet connection icon in the notification bar, and open Network and Sharing Center... In the new window select Change advanced sharing options.

There will be two profiles. Home or Work, and General. We change the one that is written current profile... You can make these settings for both profiles.
First of all, put the switch next to Enable network discovery... Also, turn onFile and Printer Sharing, and include share folders... See screenshot below.

Scroll through the settings page, find and open the tab All networks, or General, and necessarily disable Sharing with password protection.

After these steps, it is advisable to restart your computer. This is actually all the settings, the local network should already work. To check, you need to go to the explorer (My Computer) on one of the computers, and open the tab on the left Net... All computers on the network will be displayed there. In the screenshot, you can see my computer, and another one from the network.

We can already go to a computer on our home network, there will be access to shared folders.

If you do not have computers on the network, or you do not have access to a computer, then see the solutions at the end of this article.
Setting up file and folder sharing
As I wrote above, you already have access to shared folders. But, we may need to open shared access to some other folder, which is, for example, on the local drive D. This can be done without any problems. After we open the shared access to the folder, all computers from the local network will be able to view the files located in it, modify them, and add new files to this folder (however, this depends on what permissions we enable).
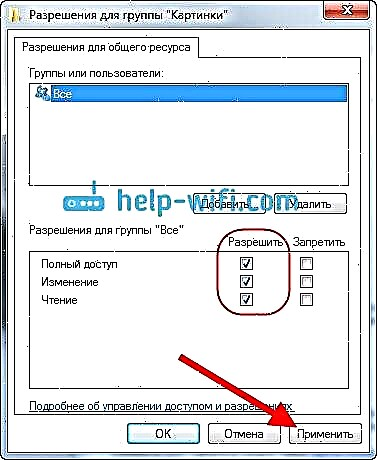
For example, I want to share my Pictures folder. To do this, right-click on it, and select Properties... Go to the tab Access, and click on the button Advanced customization... We put a tick next to the item Share this folder, and click on the button Permissions.

In the window that opens after clicking the buttonPermissions, we need to set the permissions to this folder. So that netizens can only view files, then leave a tick only opposite Reading. Well, for full access to the folder, with the ability to change files, set all three checkboxes.

Click on Apply and Ok... In the window Advanced sharing setup, also press the buttonsApply and Ok.
In the folder properties, go to the tab Safety, and press the button Edit... Another window will open in which we click on the button Add to... In the field we write "All" and press Ok.

Select the group All, and from below we mark the necessary access points for this folder with checkmarks.

All, after these steps, there will be a general access to this folder from all computers on the network. Starts working without rebooting, checked. Open this folder from another computer:

Everything was done in a confusing way, until you figure it out ... It was possible somehow to make these settings more simple and understandable. But, everything works. It turns out that I have access to a folder that is located on another computer. And this is all over the air, since I have both computers connected to the router via Wi-Fi.
By the way, this folder will also be available from smartphones and tablets that are connected to this Wi-Fi router. To view network folders on Android, I advise you to install ES Explorer, or use a standard explorer. Everything is working:

Now we will also look at possible problems and errors that can very often be encountered during the configuration process.
Possible problems and errors when setting up a home local network
If during the configuration process any errors or problems appear, then first of all disable antivirus, and other programs that might block the connection. If the problem is in the antivirus, then you will need to add your connection to the exceptions.
- Computers from the local network do not appear on the Network tab. In this case, on all computers, we check the working group and the sharing settings. Open a tab in the explorer Net, right-click an empty area, and select Refresh... Another important point, very often antiviruses and firewalls block access to the local network. Try disabling your antivirus for a while. Also, you need to make sure that there is a connection to the router.
- Shared folder cannot be accessed. Another problem, when we seem to have set everything up, opened public access, but when we try to open a folder on a computer on the network, a message appears that we do not have access, we do not have permission to access this folder, we could not open the network folder, etc. Or, you are prompted for a username and password.
Be sure to check the sharing settings in the properties of this folder. There are a lot of settings, everything is confusing, maybe you missed something. Well, again, turn off the antivirus, it can block. - A computer that is connected via Wi-Fi cannot be seen by other computers on the local network. Or vice versa. If you have a network built with computers and laptops that are connected both wirelessly and by cable, then there may be problems with a certain connection. For example, laptops that are connected via Wi-Fi may not appear on the local network.
In this case, pay attention to which profile you enabled network discovery (settings at the beginning of the article). It is also advisable to assign the status of a home network to connect to your Wi-Fi network. Well, be sure to try disabling your antivirus.
I think you did it. If something could not be configured, then ask in the comments. Also, do not forget to share your tips on this topic.