Another detailed instruction for configuring TP-LINK routers. And this time we will be configuring TP-LINK TL-WR840N. An interesting router model that is suitable for a small home or office. I have already connected everything, checked, took a photo, and now I will write in detail and show you how to properly configure the TP-LINK TL-WR840N router, so that it distributes the Internet to your devices and pleases you with its work.

I will not talk about the router now, I will review and review it in a separate article. Yes, and you most likely bought this router, and you are no longer interested in reading about its characteristics. You need to set it up faster. As for the configuration itself, there are two options: configure with the power of the utility that is located on the disk (which should be included in the kit), or through the web interface of the router. We will be configuring through the web interface. There you have access to a variety of settings that you may need later, and you will already know where to find them. And not everyone now has the opportunity to run the program from disk.
We will configure our TP-LINK TL-WR840N according to the standard scheme:
- Installing and connecting the router.
- Internet connection setup.
- Setting up a Wi-Fi network on TL-WR840N and protecting a wireless network with a password.
- Setting up IPTV (if your provider provides this service).
- Protection of router settings.
If you have previously set up a TP-LINK router, then you can set up this model with your eyes closed, since everything is identical there. And the settings are in Russian, which is important.
How to install and connect TP-LINK TL-WR840N?
If you already have everything connected, and you are just re-configuring, then you can skip this step. And if you just bought a router, then the first thing to do is connect the power adapter to it, plug it into an outlet, and check if the power is turned on with the button on the back of the router. There is a separate button for turning on / off the router, which is very convenient. The indicators on the front panel should light up.
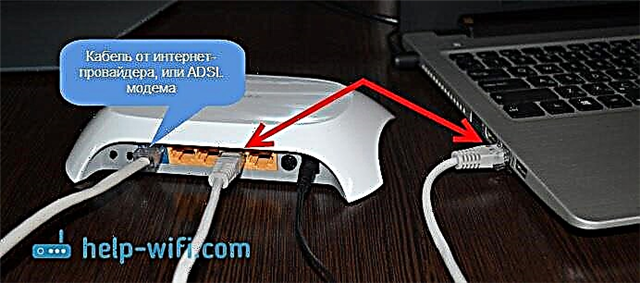
Further, in WAN connector (it is blue) you need to connect a cable from our Internet provider, or from an ADSL modem. If you have the Internet via a modem, then TL-WR840N can be connected to the modem using a network cable that comes with the router. On the router, connect to the WAN connector, and on the modem to the LAN.
Well, it remains to connect a computer or laptop to the router using a network cable. I recommend doing this only for configuration, then you can disconnect the cable, and the router will distribute the Internet by itself via Wi-Fi. You can connect 4 devices by cable. On the router we connect to LAN connector, and on the computer to a network card.
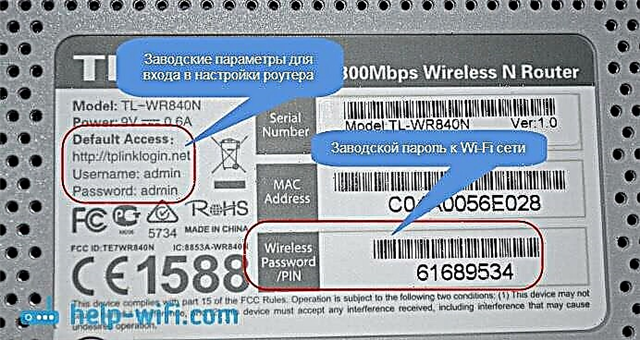
And if you do not have a computer or laptop, but only mobile devices, then you can configure from them. In this case, connect to the Wi-Fi network that appears immediately after turning on the router. The wireless network will have a standard name (if the router has not been configured yet), and will be closed with a factory password. This password is printed on the bottom of the TP-LINK TL-WR840N router, on a sticker. It also contains the factory parameters (address, username and password) that must be used to enter the router settings.
As a result, you should be connected to the router via a network cable, or via Wi-Fi.
Two important points:
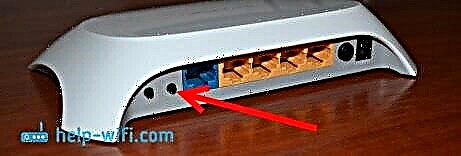
If the router has already been configured before, then reset the settings by holding down the button for 10 seconds WPS / RESET when the power of the router is on.
This will remove all parameters that may already have been set and that may interfere with us.
I recommend that you update the TL-WR840N firmware before setting up. Most likely, the site already has a new version. I updated before setting up. You can download the firmware for your hardware version by following the link http://www.tp-link.ua/ru/download/TL-WR840N.html#Firmware. Just be sure to check the hardware version of your router (indicated on the bottom of the device on the sticker), and flash only when connected via cable. Better yet, follow the instructions: detailed instructions on how to update the firmware on the Tp-Link router.
Login to TL-WR840N Control Panel and Internet Setup
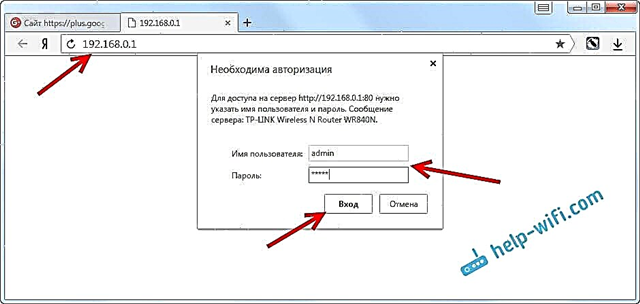
So we are connected to the router. Now open any browser, and go to it athttp://tplinkwifi.net, or 192.168.0.1... A window should appear asking for a username and password. By default, it is admin and admin... We indicate them and get into the control panel. If you can't open the settings, then see this article for possible solutions.
Now is the most important thing. Configuring the router to connect to the provider. So that the router can connect to the Internet, and distribute it to all your devices.
If you have some kind of Internet connection on your computer, now we don't need it. The connection will be established by the router.
You should definitely know what type of connection your ISP is using. It can be: Dynamic IP, Static IP, PPPoE, L2TP, PPTP. And if you do not have a Dynamic IP, then you should also have connection information provided by your provider. This is usually a username and password (it can also be a server address, and an IP address).
In the settings, open the tab Net – WAN, and in the dropdown menuWAN connection type select the connection that our provider uses (if you connected via a modem, then select Dynamic IP, and save the settings).
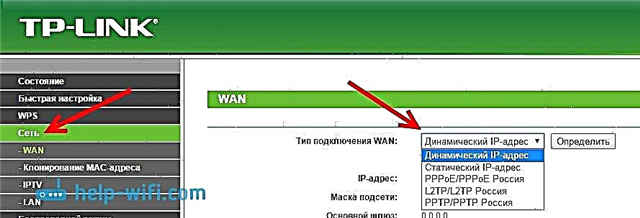
If you have a Dynamic IP connection, then the Internet should immediately work through the router. It may also be such that the provider makes a binding by MAC address. This can be clarified with the provider itself, and ask them to register the MAC address of the router (indicated at the bottom of the device), or clone it from a computer to which the Internet was previously connected.
Configuring other connections:
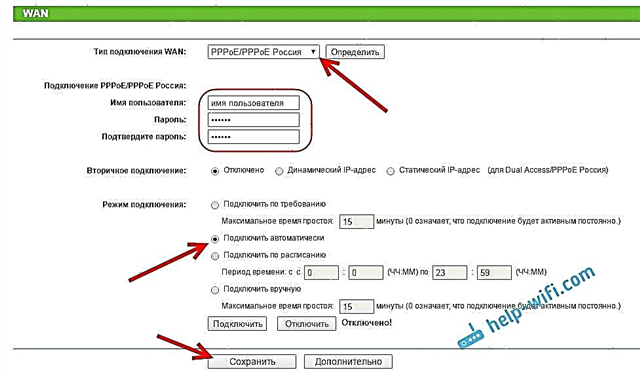
It is enough to choosePPPoE, specify the username and password, set the automatic connection, and save the settings.
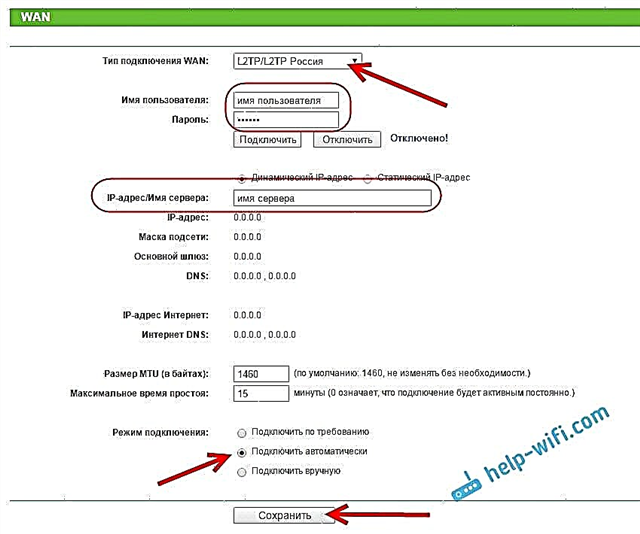
In the same way, we select the desired connection, specify the username and password, then specify the IP address, or the server address (for example, tp.internet.beeline.ru), set the automatic connection and save the settings.
The main thing is that the router is connected to the Internet. If this happens, then you can continue to configure.
Setting up a Wi-Fi network and password
In the control panel, open the tab Wireless mode... Come up with a name for your Wi-Fi network, and write it down in the fieldNetwork name... You can leave the default name if you like. Next, on the menu Region select your region and click on the button Save.
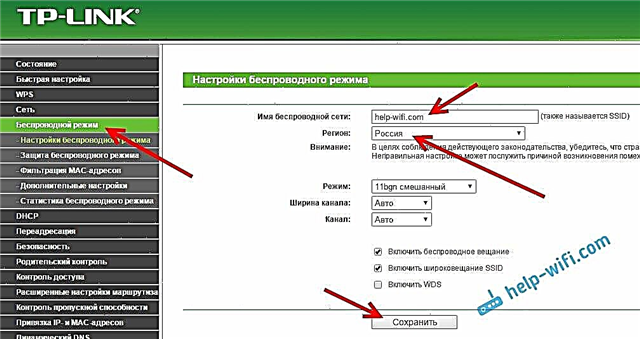
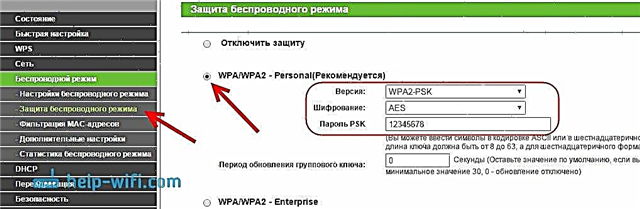
Open the tab Wireless Securityto change the password of our Wi-Fi network. Please selectWPA / WPA2 - Personal (Recommended), Version - WPA2-PSK, Encryption - you can leave AES... And in the fieldPSK password write down the password (at least 8 characters), which will need to be specified when connecting to your Wi-Fi. Click the button Save.
Everything, the wireless network is configured.
Change factory password admin
Those devices that will connect to your router will be able to enter its settings. This is not entirely secure, so I recommend changing the default admin password to something else. This can be done in the tab System Tools – Password.
Everything is simple there. We indicate the old data, and set the new ones. Remember to save your settings.
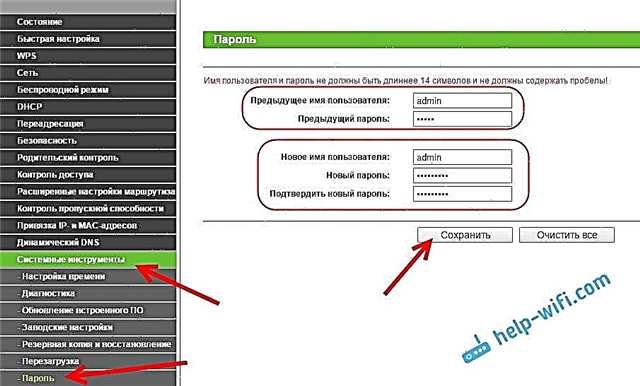
After that, when entering the settings, you will need to specify the password we have set. Try not to forget it, otherwise you will have to do a factory reset.
We have set the basic settings, it remains only to reboot the router for the settings to take effect. You can do this on the tab System Tools – Rebootby pressing the button Reboot... After that, you can connect your devices to the router and use the Internet.
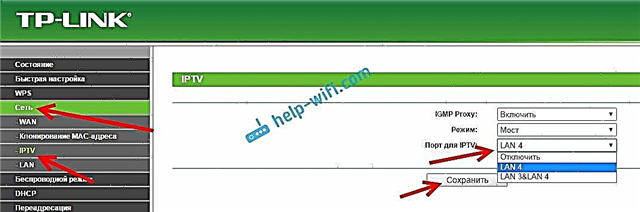
Setting up IPTV on TP-LINK TL-WR840N
If your ISP provides digital TV service, then it will need to be configured. This can be done in the control panel on the tab Net – IPTV.
In most cases, it is enough to select the mode Bridge, and indicate to which LAN connector you want to connect the STB set-top box. If you need to configure IPTV with VLAN ID, then you need in the menuMode choose802.1Q Tag VLAN.
I think these are all the settings you will need. You can find instructions on how to configure other functions on our website in the "TP-LINK" category.
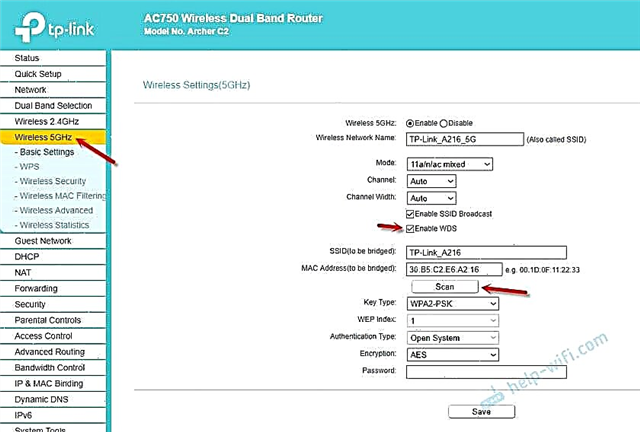
I also wanted to add that TP-LINK TL-WR840N supports WDS mode. You can set it up according to this instruction: https://help-wifi.com/tp-link/nastrojka-routera-tp-link-v-rezhime-mosta-wds-soedinyaem-dva-routera-po-wi-fi/.
If you still have any questions about configuring this router, then ask them in the comments. Good luck!