Most often, users of Wi-Fi routers wonder how to increase the speed of the Internet over a wireless network. And on this topic, I already wrote a separate article, which can be viewed here. But, not infrequently there are situations when you need to limit the Internet speed on the router. And in this article I will show in detail how to limit the speed of the Internet connection on TP-LINK routers. We will consider two cases: limiting the connection speed for absolutely all devices, and limiting the speed for some devices. For example, for multiple computers, phone, tablet, etc.
An important point: if you have a public network, perhaps not even password protected, for which you need to set a maximum speed limit, then it is best to use the guest network function. If your TP-LINK router has the ability to launch a guest Wi-Fi network. The fact is that in addition to the main network, we will launch a guest network, which will be completely isolated from the main network, and set a speed limit for the guest network. And this limitation will apply to all devices that will be connected to the guest Wi-Fi. How to configure all this, I wrote in detail in the article: setting up a guest Wi-Fi network on a Tp-Link router.
This is very convenient if you need to organize access to the Internet via Wi-Fi for clients in some cafe, office, store, car service, etc. We just start the guest network and set the speed limit in the TP-LINK router settings.
Well, if you have a home Wi-Fi network, and you want some client to forcibly reduce the speed of the Internet connection (naughty children, a neighbor who had to give access to Wi-Fi :)), then follow the instructions below, and you have everything will work out.
Turning on the bandwidth control function on TP-LINK
Before proceeding to the configuration, we need to enable the bandwidth control function, and set the outgoing and incoming speed that our Internet provider provides.
We go into the settings of the router. In the browser, go to the address 192.168.1.1, or 192.168.0.1... Or, see the detailed instructions for entering the settings of TP-LINK routers. Settings may differ depending on the model and firmware version. Also, many have settings in English, while others in Russian. I will take screenshots in the English version, but I will also write the names of the menu items in Russian. I will check everything on the Tp-Link Archer C20i router.
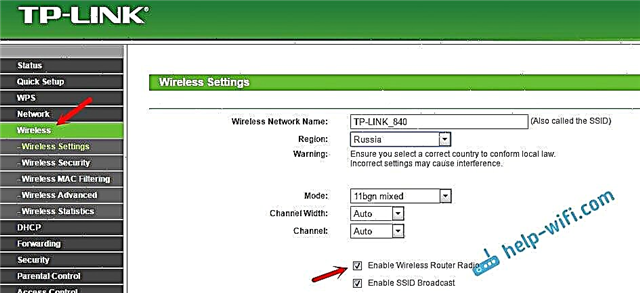
In the router settings, you need to open the tab "Bandwidth Control" (Bandwidth Control), check the box next to "Enable Bandwidth Control".
You may also need to select "Line Type". We put "Other" (Other).
We set the maximum speed: outgoing (from the device to the Internet), and incoming (when we download something from the Internet to a computer). This is the speed that your internet provider gives you. For example, if the provider gives 20 Mbit / s for upload and download, then we need to convert these 20 Mbit / s to Kbit / s, and indicate in the appropriate fields. The translation is very simple: 20 Mbps * to 1024 Kbps = 20480 Kbps.

Now it remains only to set the speed limit settings that we need. As I wrote above, we will consider the restriction settings for all devices that are connected to the router, and only for certain devices by IP address.
Limiting the Internet speed for some devices on the TP-LINK router
In the settings of the router, you can set the maximum speed for each device. These settings are bound by IP address. Therefore, first we need to bind the IP address to the MAC address of the device for which we want to limit the speed. This is necessary so that a specific device always receives the same IP address, for which the bandwidth settings will be set.
Binding an IP address to a MAC address
To bind the IP address to the MAC address of the device, you need to go to the "DHCP" tab - "DHCP Clients List". There you will see a list of devices that are currently connected to the router. We need to look at and copy the MAC address of the desired device. Also, you can pay attention to the IP address that is currently assigned to the device.

If the device for which you need to set the bandwidth settings is not currently connected to the router, then the MAC address can be viewed in the settings, somewhere in the "About device" section (if it is a mobile device). And if you have a computer, then see this article.
We already know the MAC address of the device. Go to the "DHCP" tab - "Address Reservation". Enter the MAC address of our device. Then, we indicate the IP address that will be assigned to this device (you can use the address from the "DHCP Clients List" page), or, for example, specify 192.168.0.120 (if you have a router's IP address 192.168.1.1, then the address will be 192.168 .1.120). We put the status "Enabled" (Enabled), and save the settings.

In this way, you can bind the required number of devices. Or delete / edit the created rule. Most importantly, remember the IP address that we set. We will use it to set the maximum speed for this device.
Set the bandwidth settings for the Wi-Fi client by IP address
Click on the "Bandwidth Control" tab. And in order to create a new rule, click on the "Add New" button.

On some routers (firmware versions), you need to open the "Bandwidth Control" - "List of Rules" tab, and click on the "Add ..." button.

A window will appear in which you need to set some parameters:
- Check the box next to Enable.
- In fieldIP Range we register the IP address that we have reserved for the device.
- FieldPort range leave blank.
- Protocol - choose "ALL".
- Priority (this item may not exist). The default is 5, I think you can leave it that way.
- Egress Bandwidth (outgoing traffic speed) - set the minimum value (I set 1, with a value of 0 no rule is created), well, we indicate the maximum outgoing speed for this device. For example, I set 1 Mbps (that's 1024 Kbps).
- Ingress Bandwidth (incoming speed) we also set the minimum speed, and the maximum for a specific device. This is the speed with which the device will receive information from the Internet. I put in 5 Mbps.
We save the created rule by clicking on the "Save" button.

You will see the created rule. It can be edited, selected and deleted, or another rule can be created. For example, to limit the connection speed of other devices.

That's all, according to this scheme, you can set the maximum speed for almost every device that connects to your router. To check the result, just check the Internet speed on the device for which you created the rule. I've already written about how to check your internet connection speed.
How do I limit the speed of a Wi-Fi network for all devices?
You may need to set the limit not for specific devices, but for all clients that are connected to the TP-LINK router. This is very easy to do. First, go to the DHCP tab and see what range of IP addresses is set there. You can remember them, or copy them.

Next, we need to create a new rule, as I showed above. On the "Bandwidth Control" tab (or "Bandwidth Control" - "List of Rules"), click on the "Add New" or "Add" button.
We indicate the range of IP addresses that we looked at on the "DHCP" tab, and indicate the maximum outgoing and incoming speed. We keep the rule.

Now, when connecting, the devices will receive an IP address from the range specified in the DHCP server settings, and the rule that we created in the bandwidth control settings will be applied to them.
Data prioritization on TP-LINK routers with new firmware (blue)
If you have a TP-LINK router with a new firmware version (which is in blue tones), for example, TP-LINK Archer C8, then the bandwidth settings are called "Prioritizing data"... They are located on the "Advanced Settings" tab.
There it is also enough to turn on the "Data prioritization" function, set the speed that the provider gives you, open the "Additional settings" tab, and set three blocks with different throughput as a percentage of the set speed. Everything is simple and logical.

Below you will see three blocks with different priority in speed, from the one we set in the settings. In each of these three blocks, you can add the required devices, and the speed limit will be applied to them. It is enough to click on the "Add" button, select the required device from the list of connected ones (or set the name and MAC address manually), and click Ok.

In the new firmware version, of course, this function has been well improved. I would even say reworked. Setting up everything is very simple and straightforward. But, as far as I understand, there is no way to set a strictly defined speed. Only as a percentage of the one specified in the settings.
Anyway, everything can be set up without any problems, and everything will work. If you have any questions, then ask in the comments. Good luck!