There is one cool feature in Windows 10 called "Project to This PC". In the latest updates, it has been added to the System Options and the Project menu. Previously, this all worked through the Connect app. In principle, as now, but the function itself is already integrated into the system. Thanks to this, it has become more convenient to use. Thanks to this function, you can broadcast the image to the screen of a stationary computer (monitor) or laptop from other devices. That is, you can broadcast to Windows 10 an image from an Android phone / tablet, or from another computer / laptop on Windows 8.1 and Windows 10.
Using this function, you can duplicate the screen from computer to computer, or from phone to computer via Wi-Fi network. No wires required. Uses Miracast technology. This means that the devices should simply be located close to each other (approximately within a small apartment or house). It is not necessary to connect the devices to the same Wi-Fi network. Devices connect directly, the connection does not take place through a router. You don't need to connect to the internet at all.
 Sound is also transmitted along with the image. For example, if we output an image from the phone to our computer or laptop with Windows 10, then the sound will also be played through the computer speakers. And one more trick - you can control the device from which we are projecting the image from the computer to which we are projecting. But in my case, this feature only worked when projecting an image from another computer onto a computer. When broadcasting a picture from a phone to Android, I did not have the opportunity to control the phone from a computer. There appears some message with instructions, but it is impossible to execute it. I understand that control is possible only when projecting from computer to computer. Devices with touch screens are most likely not supported.
How does computer projection work and on what devices?
As I wrote above, everything works over Wi-Fi. Therefore, both devices must have a Wi-Fi module with Miracast support. If we are talking about stationary computers (PCs), then you need to buy and connect a Wi-Fi adapter. Read more in this article. In laptops, it is usually built-in. Wi-Fi on the computer should work (driver installed, wireless enabled). Here are the same requirements as when setting up the "Wireless Display" function in Windows 10. When we display the image not on the computer, but from the computer to the TV screen, for example.
You can receive images from other devices only on Windows 10. You can broadcast images from other computers that have the "Connect to a wireless display" function. These are computers running Windows 8.1 and Windows 10. Well, and accordingly with hardware (Wi-Fi module, video card) that supports this feature. You can also duplicate the screen to your computer from phones and tablets that run on Android. This function may have different names depending on the device, Android version, shell, etc. For example, Smart View on Samsung devices. Or "Wireless Display", "Miracast", item "Broadcast" in the screen settings.
This doesn't work on iPhone and iPad. These devices use Apple's proprietary technology called AirPlay to mirror the screen. Not Miracast, which is used in our case. If you have an iPhone or iPad, then you may be interested in reading an article on how to duplicate the screen of an iPhone or iPad to a TV.
How I tested everything: I have a relatively new and powerful PC with a Netis WF2190 external USB adapter, an old ASUS K56CM laptop but with a replaced Wi-Fi module with Intel Dual Band Wireless-AC 3160 and not the newest Samsung Galaxy J5 2017 (Android 8.1) phone. Windows 10 is installed on the PC and laptop.
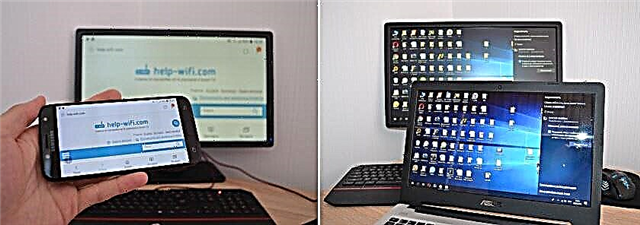
From a PC, I easily transmit the image to the laptop screen and vice versa - from the laptop, the image is broadcast to the computer monitor. I have not been able to use the "Project to This Computer" function to connect my Samsung phone to my laptop. The phone sees the computer, Windows prompts you to connect, but everything hangs during the connection process. In addition, on a laptop, in the settings of this function there is the following warning: "This device may have problems with displaying content, since its hardware was not specially designed for wireless projection."

While on a stationary computer, the screen from this phone is duplicated without any problems at all. And this warning about possible problems with displaying content on a stationary computer is not. Apparently this is due to outdated hardware in the laptop, or drivers. But let me remind you that a bunch of PC - laptop and laptop - PC works fine.
Set up Project to This PC in Windows 10
In Windows 10 settings, under "System" there is a tab "Projecting to this computer"... We open it and look at the settings:
- In order for Windows and Android devices to be able to project an image onto our computer, we need to give this permission. In the first drop-down menu, select "Available everywhere "... The item "Always disabled" disables this function, and the item "Available everywhere in secure networks" is not clear at all what it does (if you know, write in the comments).
- Request for projection to this computer: "Only for the first time" - the connection request will appear only once during the first connection, in the future the image from this device will be transmitted automatically. "On every connection" - a request for permission to connect will appear every time.
- Require a PIN to bind. If you enable this function, you will need to enter the PIN code on the device from which the projection will be performed. The PIN code will be displayed on the computer screen. I think this is unnecessary. A simple connection request is sufficient.
- This computer can be detected for projection only when it is connected to a power source. If you enable this item, then as far as I understand, the function will not work when the laptop is powered by battery.
- Computer name. This name will be displayed on the Android device or another computer from which we will connect to this computer to broadcast the image. It can be changed if necessary.

With the settings, everything is simple and clear. It is enough to select the item "Available everywhere" in the first menu. Well, turn off the setting at number 4 if you have a laptop and it is not connected to power.
If you, like mine, on a laptop (above is a screenshot from a PC, everything is ok) there is a message "This device may have problems displaying content, since its hardware was not specially designed for wireless projection", then all smoothly enable this function and try to connect the device.

In my case, only the phone didn't connect. And from a laptop to a PC, the broadcast worked. We will analyze possible problems with configuring this function and errors in the process of connecting devices at the end of this article.
How to mirror screen from phone or tablet to Windows 10 computer?
Let me remind you that this method only works on smartphones and tablets that run on Android. First you need to enable the "Project to this computer" function (on the computer that will act as a wireless monitor), as I showed above.
On the phone, you need to open the status bar and find the icon for starting the screen broadcast using Miracast technology. On my Samsung phone, this is Smart View (located on the second screen, swipe to the left). Perhaps on your device this function is in the settings, somewhere in the "Connections" section, or "Screen".
In the list of available devices for screen mirroring, select your computer.

On the computer, you need to confirm the phone connection to perform projection.

The Connect application will open in full screen and the connection process will begin.

If all is well, then in a few seconds the phone screen will appear on your computer monitor.

Another strange message will appear that the touch input is disabled. Where it will be written how to enable it. But as I already found out (and wrote at the beginning of the article), the touchscreen phone control does not work in this mode.

You can exit full screen mode, resize the window, or minimize the Connect application.

In horizontal mode, everything works fine too. For example, you can stream YouTube videos without any problem.

The sound from the phone is also transmitted to the computer. You need to control the wireless transmission of images via Miracast on your phone. There, a special icon is displayed on the screen for this. You can pause the broadcast, change the device, or disconnect from the computer.
Cast an image from a computer / laptop to another computer with Windows 10
The scheme is the same as in the case of connecting the phone. On the computer on which we will display the image, you need to activate the "Project to this computer" function (I wrote about this above).
Next, on the computer from which we will display the image via Wi-Fi, you need to go to the "Project" menu. To do this, press the key combination Win + P... And go to the section "Connecting to a wireless display".

A search will begin for devices where our computer should be, on which we want to project an image. We select it.

Next, on the computer that will receive and display the picture on its screen, you need to confirm the connection.

The connection process starts. After a successful connection, the image from one computer will be transferred to the screen of the other and displayed in the "Connect" application. This is how projection from one computer to another works in Windows 10. Wirelessly, over a Wi-Fi network.

On the computer that is broadcasting, in the "Project" (Win + P) - "Connect to a wireless display" menu, you can check the box next to "Allow mouse, keyboard, touch and stylus input from this device". This will make it possible to control the computer that is broadcasting from the computer that receives the broadcast of the image.

You can also change the projection mode (as when connecting via HDMI cable).

You can, for example, extend the screen to another computer, or duplicate it ("Repeating" mode).
Possible issues when using Windows 10 as a wireless monitor
Everything does not work as perfectly as we would like. This may be because the "Project to This Computer" function is in development mode. For example, it is not always possible to connect devices the first time. Sometimes I had to restart my computer. Since when connecting to another computer, an error simply appeared "Failed to connect".

Or, the receiving computer (in the Connect app in Windows 10) displayed an error "There was a problem with projection.".

If you were unable to set up projection to a wireless monitor in Windows 10 the first time, try again. If a warning is displayed in the settings that your device may have problems with displaying content due to its hardware (I wrote about this at the beginning of the article, there are also screenshots there), then be prepared for the function "Projecting to this the computer "won't work at all. Or it won't work with all devices.
The solution to the most common problems:
- In Windows 10 settings, "Projecting to this PC" does not work, settings are grayed out. Error: "We are still trying to determine the capabilities of the component" or "This product does not support Miracast signal reception, so wireless projection to it is not possible."

Make sure your computer has a Wi-Fi module, it is turned on and working. Check the status of the wireless module in the device manager. The module installed in your computer may not support Miracast, so this function is not available. Perhaps the article updating (installing) the driver on Wi-Fi in Windows 10 will be useful to you. You can also try to update the driver if there is an error in the settings of the wireless monitor: "This device may have problems with displaying content, since its hardware was not specially designed for wireless projection. " - If other devices cannot see the wireless monitorthen make sure they are not very far apart. Check if the projection function is enabled on the receiving computer (you need to set "Available everywhere"). You can also try to disable this feature and enable it again. Or restart your computer. Manually launch the "Connect" application (via search in Windows 10).
- The computer does not have a Connect to Wireless Display button. This is what you may encounter when you want to connect your computer to another computer for screencasting. Most likely, this computer has limitations from the Wi-Fi module, or video card. More information on this topic is in this article.

If you have any problems, start by updating the Wi-Fi adapter driver, as this is most likely the cause. Download drivers only from the official website of the manufacturer of the wireless adapter or laptop. You can install the latest Windows 10 updates. If experimenting with drivers does not help, wireless projection does not work, then there really are limitations on the hardware side. Perhaps the problem will be solved by replacing the Wi-Fi module, or connecting a USB adapter. If you have a laptop, after connecting the USB adapter, do not forget to disable the built-in Wi-Fi module in the device manager.
Leave comments, ask questions and do not forget to share useful information on this topic. Good luck!