Despite the fact that the TP-Link TL-WR945N router comes with a detailed manual with pictures, and the setup process itself is very simple and no different from other devices from TP-Link, I still decided to write a small setup guide this router. At least so that you can ask your questions in the comments to this article, or tell us something interesting about the TL-WR945N.
If you are just choosing a router for yourself, then I recommend that you read my review of the TP-Link TL-WR945N router. There I talked a little about the technical characteristics of this router and its capabilities. And, of course, about my impressions of the appearance and the metal case in which this router is made.
But, if you went to this page, then most likely you have already purchased this router and want to configure it faster. Or maybe they have already configured it, but ran into some problem. Let's figure it out now. In any case, you have probably already appreciated how beautiful and unusual it is. You can then leave a review in the comments 🙂
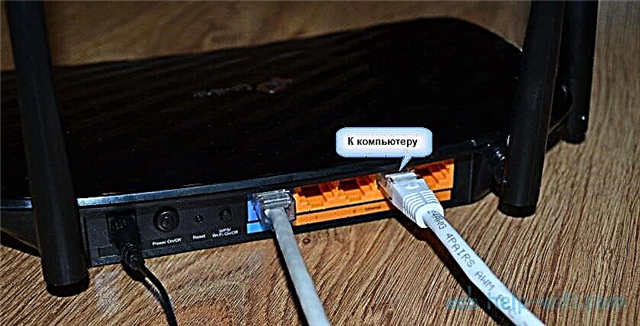
First, we need to connect everything. The procedure is standard. We connect the power adapter to the router and plug it into an outlet. Then we connect the cable from the provider or ADSL modem to the WAN port (it is blue). Well, we connect to the router from our device. If possible, it is better to connect via a network cable. If you have a laptop with LAN, or a PC.

Or, establish a Wi-Fi connection. The factory name of the Wi-Fi network (SSID), and the factory password (Wireless Password / PIN) are indicated on the card that was next to the router. It also contains the address for entering the settings, password / login, MAC address, hardware version, etc.

This is very useful information. Don't lose this card.
After connecting, you can proceed to the configuration.
Logging into the web interface and configuring TP-Link TL-WR945N
Note:
If the router has already been configured, or there have been attempts to configure it, then it is better to do a Reset. To restore factory settings. To do this, you need to hold down the RESET button for about 10 seconds.

The indicator will turn blue, then yellow (or vice versa) and the router will reboot.
If after connecting (and after downloading, which lasts 15 seconds), the indicator on the router is blue, then this means that the Internet through the router is already working, and you only need to configure the Wi-Fi network.

Most likely your ISP is using the Dynamic IP connection type.
To open the settings of the TL-WR945N router, you need to go to the address in the browserhttp://tplinkwifi.net and specify the username and password (admin and admin). More detailed instructions: tplinkwifi.net - enter the router settings. If you cannot enter the settings, then try to go to the address 192.168.0.1. And if there is no access by the IP address, then see the article: there is no connection and access to 192.168.1.1 and 192.168.0.1.

The quick setup wizard will open immediately. You can try to configure the router with it, or close it by clicking "Exit" and configure everything yourself.

First, we need to set up an internet connection. If not already installed. I already wrote above, if the cable from the provider to the router is connected, the indicator is blue, the Internet is working, then you can go directly to setting up the Wi-Fi network.
Setting up an internet connection
In order for our router to connect to the Internet, you need to correctly set all the parameters in the "Network" - "WAN" section. You need to select the type of connection (Dynamic IP, Static IP, PPPoE, L2TP, PPTP) and, depending on the type of connection, specify the parameters (username, password, server address, IP settings).
For example PPPoE:

Important! If you enter the parameters incorrectly, the router will not be able to connect to the Internet and distribute it. All settings that need to be specified in the "WAN" section, you can check with your provider.
The LED on the front of the TL-WR945N should be solid blue.
Configuring Wi-Fi network and password on TL-WR945N
Open the section "Wireless" (Wireless Settings). In the "Wireless Network Name" field, enter the name of your Wi-Fi network and save the settings.

Next, open the "Wireless Security" section and in the "Wireless Password" field, specify the password that will protect your wireless network. It must be at least 8 characters long.
Write down the password so as not to forget. Save the settings.
Protecting the web interface
It is necessary to change the factory password admin so that no one but you can open the router settings (but this is not necessary).
You can change it in the "System Tools" - "Password" section.
Just enter your old username / password and new ones. I only changed my password. The username was left by admin.

If you forget your password, you will have to do a factory reset to enter the control panel. So it's better to write it down somewhere.