I've been using exclusively wireless mice for quite some time now. They are very convenient to use both with a laptop and with a stationary computer. I have probably changed about five. True, I had to spend on batteries, but I took the last model with the ability to charge and I'm very pleased. Today the article is not about my gadgets, but about how to connect a wireless mouse to a PC or laptop on Windows. The connection process itself is not very complicated, but since people ask, it means that it is not always possible to connect. I will try to make a universal instruction that is suitable for different mice (Logitech, Rapoo, Trust, Microsoft, Maxxter, Defender, HP, A4Tech, Razer, Speedlink, etc.), with a different connection interface. Wireless, of course.
Today, the market is mainly represented by wireless mice with the following wireless interfaces:
- Radio interface (Wireless) Are those mice that are connected via a special USB adapter (receiver). It comes with a mouse. The connection itself most often operates at 2.4 GHz and often suffers from interference (from the same Wi-Fi routers). The connection is very simple: plug the receiver into the USB port of your computer / laptop, turn on the mouse and everything works. This is the most popular interface for connecting wireless keypads.
- Bluetooth - there are much fewer mice with this connection interest compared to a conventional radio interface (which are with a receiver). These are mostly more expensive models. They are very convenient to use with laptops as they have a built-in Bluetooth module. And such a mouse connects without a receiver. But for a PC, you will have to buy a USB Bluetooth adapter.
- Wireless + Bluetooth - this is when the mouse supports two connection options. Via a regular USB radio adapter and via Bluetooth (no adapter on laptops). The choice.
I think you know which connection interface your wireless mouse supports. If not, see the instructions and information on the official website.

We will separately consider the process of connecting via a radio interface (USB adapter) and separately via Bluetooth using the example of a laptop with Windows 10. There are differences. I have to enter when connected via bluetooth.
We connect a wireless radio mouse via a USB adapter
If your mouse comes with a USB receiver, and this is the only connection interface (or Bluetooth does not / does not work on your computer), then you need to connect this receiver to the USB port of a laptop or desktop computer.

After connecting, Windows should install the drivers. I have connected many wireless mice before, I have never encountered a problem when Windows cannot find or install the required driver. If it so happens that the system does not recognize the device, then you can try to download the driver or software from the manufacturer's website. We write in the search the name and model of our mouse. For example, "Logitech M185" and in the search results go to the official Logitech website. There we are already looking for a section with downloads and downloading the necessary driver. But you hardly have to do this.
Insert the battery into the mouse, or charge it and turn it on. The indicator may then light up (but it may not be).

After that, the mouse should work immediately. If it turns out that after connecting the wireless mouse does not work, then the first thing:
- Make sure the battery is not dead (by replacing it) and is installed correctly.
- Disconnect and reconnect the USB receiver.
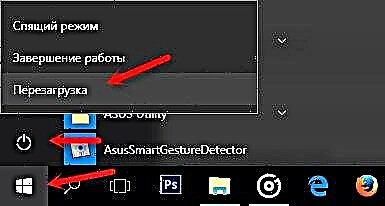
- Reboot your computer.
- You can go to Device Manager and see if the adapter appears in the "HID Devices" section. If we connect the adapter from the Logitech mouse, then the "Logitech USB Input Device" adapter should appear there. The name may differ.
- You can test the adapter and mouse on another computer / laptop. Perhaps you got married. This also happens.
In most cases, these devices connect and work without any problems at all. Especially in Windows 10, Windows 8, Windows 7.
Connecting a wireless mouse via Bluetooth (without receiver / adapter)
I want to clarify right away that connecting the mouse to a stationary computer without an adapter most likely will not work... Since the PC usually does not have a built-in Bluetooth module. Therefore, first we need to select a Bluetooth adapter for the computer, then connect and configure Bluetooth and only after that we can connect the Bluetooth mouse according to the instructions. Or use the included Wireless adapter (if your model supports this interface).
It's easier with laptops, there is built-in Bluetooth. True, it does not always work, since the necessary drivers are not installed. If your laptop does not have a Bluetooth icon in the tray and there is no adapter in the device manager corresponding to the settings in the parameters, then you must first configure and enable Bluetooth (for example, Windows 10). And this article contains instructions for Windows 7.
To connect, right-click on the Bluetooth icon and select "Add device".

Turn on your mouse. Next, you need to activate the connection mode. There must be a button for this. It is labeled "Connect" on my mouse. You need to press it (perhaps press and hold). The indicator should start flashing actively. The process of activating the connection mode of course may differ depending on the manufacturer and model of the mouse. See instructions.

On the computer, in the window that has already opened, select the "Add Bluetooth or other device" item. Then click on the "Bluetooth" item. When our mouse appears in the list, just click on it. In Windows 7, a window will immediately open in which the devices available for connection will be displayed.

A message should appear that the device is ready to use.

The mouse should already be working. Click "Finish". The connection is complete.
In Windows 7, everything is about the same, only the windows and menu items themselves look different.
Advice! After connecting, I recommend downloading and installing the software from the manufacturer's website for your wireless mouse. Or install it from disk, if available. For example, for Logitech mice - "Logitech Options".
This is a program with which you can configure additional functions. For example, assign actions to additional buttons, adjust the pointer speed, etc. It all depends on which mouse you have. If the simplest one, then you may not need this program.
If the computer does not find a Bluetooth mouse, then first of all make sure that it is turned on and the connection mode is activated. Try connecting it to another device. You can even connect to your phone or tablet (on Android).
Auto Disconnect Touchpad After Connecting Wireless Mouse
On laptops, you can configure everything in such a way that after connecting a mouse (wireless or wired), the touchpad will turn off automatically. And this is very convenient, because it only interferes. For example, when typing.
As far as I understand, this can only be done when your laptop has a touchpad driver from the laptop manufacturer's website. I checked it on Lenovo, everything works.
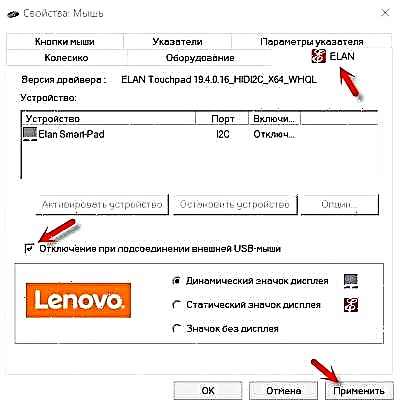
Open Start (or search) and write "mouse". Open "Mouse Options".

Go to "Additional Mouse Options".

The new window should have a tab "ELAN" (you may have a different one). You need to go to it and put a tick next to the "Disconnect when connecting an external USB mouse" item. Click "Apply".

Everything is ready! Now the touchpad will not work when the mouse is connected.
If you didn't manage to connect the mouse, if you have any questions, or if you want to share useful information on the topic of the article, leave your messages in the comments.