Many people still associate Mesh Wi-Fi systems with some incomprehensible and complex devices. And when choosing a device to create a Wi-Fi network in their home, people very often prefer conventional routers for this reason. Everyone is already used to them, many have experience in self-configuration, a lot of instructions, etc. But in fact, installing and configuring a Mesh Wi-Fi system is no more difficult than a router, or even much easier, faster and more enjoyable. Especially TP-Link Deco systems, where everything is done through a simple and intuitive application from a mobile device. And if we are talking about setting up TP-Link Deco P7, then it is still easier there, since this Mesh system has built-in Bluetooth, which makes the connection of the mobile device and the system module almost invisible to the user. The setup process is very thoughtful and does not cause any questions even for those users who are "you" with similar devices.
In this article, we will connect and configure the TP-Link Deco P7 system, which I already talked about in this article. Like the entire line of TP-Link Deco devices, this model does not have a web interface (as in conventional routers, where you can enter the settings through a browser). Configuration is done via the Deco app from your phone or tablet. And this is very convenient. In the application, step by step setup And even if some problems arise during the setup process, we will see information about possible causes and solutions. There is no need to understand any complex settings, look for the necessary settings among different sections, etc. The whole process of installing this Mesh Wi-Fi system comes down to the fact that you need to connect the module to an outlet, connect it to the Internet (only one), install and open the Deco app, and follow the instructions in the app itself.
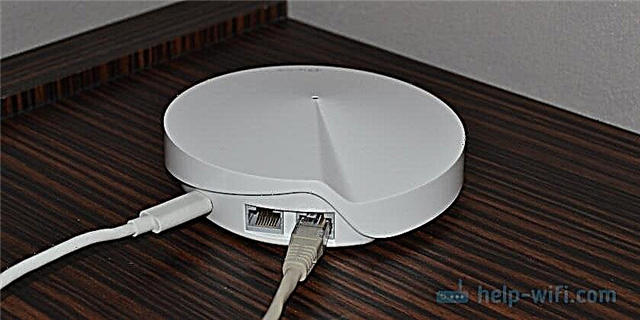
I propose to go directly to setting up TP-Link Deco P7. I have a set of three modules. If you have two modules, the process is the same. We take one module (no matter what, they are the same) and install it in the place where the Internet is connected. We connect the power adapter to the module and connect a cable from an Internet provider or modem to one of the LAN / WAN ports.

If the indicator on the module is blinking blue, the device is ready for configuration. If you turned on Deco P7 and after about a minute the indicator did not start blinking blue, then try resetting the settings. To do this, press the Reset button at the bottom of the module with something sharp for 1 second.
Turn on Bluetooth on your phone. Install the "Deco" application on your phone or tablet from the App Store, or Google Play. Go to the app and log in with your TP-Link ID. If you do not have this account, then you need to register and log in to the application. Then click on the "Let's get started" button. We choose our system, in our case it is P7. In the "What we need" window, click on the "Next" button. On the page where the connection via a modem is shown, we most likely need to click on the "I do not have a modem" button. If you connected the Internet to TP-Link Deco P7 from a modem, then click on "Next".

Next, we need to connect the Internet to the Deco P7 module (we have already done this) and confirm that the Deco indicator is blinking blue. After that, the smartphone will start connecting to Deco P7 via Bluetooth. When the module is detected, the application will ask us to choose where to install the module.

Deco P7 will try to detect the type of internet connection. I have a "Dynamic IP". If your provider also uses this type of connection, then just click on the "Next" button. Or click on "Connection Type" and choose your own. Everything is standard here, as is the case with Wi-Fi routers: Dynamic IP-address, PPPoE, Static IP-address, L2TP, PPTP. If, for example, you have PPPoE, then you will need to specify the username and password provided by your ISP. It's the same with L2TP and PPTP. Only there you will still need to specify the server address.

The process of creating a Wi-Fi network will begin. We only need to come up with and write down the name of the Wi-Fi network and the password for it. Everything is as simple as possible. After that, the system will ask us to connect to the created Wi-Fi network so that you can continue the configuration.

After our device is connected to Deco P7 via Wi-Fi network, testing of the Internet connection will begin. After the message "Deco is now online", you will be prompted to add another Deco module, or finish the setup.

Since there are at least 2 modules in this system, we continue with the configuration.
Connecting other TP-Link Deco P7 modules
First, connect power to the second Deco P7 module and wait until the indicator starts blinking blue.

If after setting up the first module you clicked on "Finish on this", then you can add another device by clicking on the (+) button in the Deco application itself (in the upper right corner).
Select the model again (we have P7), then you need to select on which floor the module will be located and confirm that the indicator is blinking blue. Well, the final one is choosing the location of the Deco module.

And then the magic! The modules will detect each other, perform connection and optimize the network. After that, you will be prompted to finish the configuration, or add another module. Since I have a set of three, I add another one. First, I install it and connect the power.

The setup process is exactly the same as for the second module.

After the installation is complete, the settings of our Mesh Wi-Fi system will open. The connected devices will be displayed on the home screen. If you click on a device, you can view information about it, or enable high priority. Clicking on "Internet" displays a list of all Deco units in our network. You can view their status and change settings. Also on the main screen is the tab "Antivirus" and "Parental Control". And at the bottom there is a "More" tab, where you can find other Mesh Wi-Fi system settings.

It's very easy to figure out the settings.
How does Powerline work in TP-Link Deco P7?
We know that the main feature of TP-Link Deco P7 is its support for Powerline technology. When the connection between the module occurs not only via Wi-Fi, but also via conventional wiring. As it turned out, you don't need to configure anything further. Configuration and connection is automatic. When we just plug the TP-Link Deco P7 power adapter into an outlet (before setting), the indicator on it glows orange.

This means that the Powerline technology is not working, there is no connection. When at least two modules have been configured, they are automatically connected via Powerline and the LED on the adapter turns green.

After setting up, the adapters of two modules glowed green, and on the third, orange. For several minutes I could not understand what was the matter, because all three modules were online. The reason was the extension cord. Powerline technology does not work through electrical filters.