A lot of articles have already been written on the topic of running virtual Wi-Fi networks on laptops. We will now configure the distribution of the Internet via Wi-Fi in Windows 10. Honestly, you can distribute the Internet from a laptop, if it works on Windows 10, in the same way as on Windows 7, or 8. There, practically nothing has changed. But, I think that an article specifically on setting up an access point in Windows 10 will definitely not be superfluous.
If you are not yet in the subject of what virtual Wi-Fi is in general, and how it is possible to distribute the Internet to other devices from a laptop or stationary computer (with a wireless adapter), then I will now try to explain everything. Look, you have, say, a laptop, the Internet is connected to it via a network cable. And also, you have a phone, tablet, another laptop, or other device that can be connected to the Internet wirelessly. Yes, you can buy a router and distribute the Internet to other devices. Or you can skip buying a router and use your laptop as a router.
Such a thing can also come in handy if you have the Internet via a 3G modem, and you need to distribute it to other devices. In any case, the feature is useful and it really works. Now we will be setting up a hotspot on Windows 10.
Update: important information! Microsoft is phasing out the Soft AP feature in Windows 10. To put it simply, launching Wi-Fi distribution via the command line will not work in Windows 10. It no longer works on devices with new Wi-Fi modules (adapters). Microsoft is simply removing this feature from its driver. I have been observing this problem for a long time. She was written about many times in the comments. For many devices, this instruction is no longer relevant.
Instead of Soft AP (launch by commands), a mobile access point will be used via Wi-Fi Direct. This is the Mobile Hotspot feature that has been in the top ten since version 1607 (see update below). In Device Manager, instead of the Microsoft Hosted Network Virtual Adapter, the Microsoft Wi-Fi Direct Virtual Adapter will now be used, through which the Mobile Hotspot works. And this is even good, no more complicated commands, settings, etc. We turned on the hotspot, chose a connection to share the Internet connection and the computer distributes Wi-Fi. But at the moment there is one problem, the hotspot does not work with PPPoE connections.
Update: After installing the anniversary update dated August 2, 2016, in Windows 10 (version 1607), it became possible to launch the access point through the settings. The feature is called Mobile Hotspot. I have already written detailed instructions for setting up: mobile hotspot in Windows 10. Launching an access point in a simple way.

If the hot spot does not work for you (for example, you have a high-speed Internet connection), then use the method that I wrote about below.
You probably already know that there are so many excellent programs that allow you to start an access point without any problems. Yes, they also work on Windows 10, and we will definitely check them, perhaps in a separate article. Now, we will configure everything through the command line. Everything there is very simple and clear, now you will see.
If this method seems difficult to you, then you can try to configure the distribution of Wi-Fi using the Switch Virtual Router program. And yet, a universal instruction for launching an access point with different programs (Virtual Router, Maryfi, Connectify).
If you have Windows 7, or Windows 8, then see the instructions for setting up a virtual Wi-Fi network in Windows 7.
Wi-Fi Hotspot on Windows 10 Laptop
The main thing is that you must have an Internet connection and it must work. I have a normal Ethernet (network cable) connected. Also, you must have the driver for the Wi-Fi adapter installed. Typically, Windows 10 installs this driver itself. Simply put, Wi-Fi must work for you and be turned on. The check is very simple:

I already wrote what to do if you do not have a "Wi-Fi" button and you cannot turn it on. Is that possible. And if all is well, then you can continue. First, we need to open a command prompt with administrator rights. Press the keyboard shortcut Win + X, and select Command Line (Admin).

Next, we need to execute several commands. Copy to the command line, and execute (by pressing Enter) the following command:
netsh wlan set hostednetwork mode = allow ssid = "help-wifi.com" key = "11111111" keyUsage = persistent

You can set your own network name and password:
- help-wifi.com is the name of the network, you can change it to your own.
- 11111111 - in my example, this is the password that will be used to connect to the created network.
With this command, we create the network itself, set the name and password. If the command is executed correctly, you will see a report that the hosted network mode is allowed and all that. Like mine in the screenshot above. Now we need to start the created network. This is done by the following command:
netsh wlan start hostednetwork

After completing it, you start the network. The laptop will already be distributing Wi-Fi.
You will be able to connect your devices to the running wireless network, but the Internet will not work. We need share the internet... In Windows 10, this is done like this:
Right-click on the connection icon and select the item Network and Sharing Center.

On the left we select Change adapter settings.

Further attention, right-click on the adapter through which you have an Internet connection. If you have a regular network cable connection, as is usually the case, then this is most likely an adapter "Ethernet". Also, it can be a high-speed connection. In the drop-down menu, select Properties.
Go to the tab Access, check the box next to Allow other network users to use this computer's Internet connection... Then, below, select from the list the connection that you have appeared (see the example screenshot below). I call it "Local Area Connection * 4". For you, it can be called differently (as a rule, it can only have a different number).

Very often, it is impossible to select the desired network in the list. How to solve this problem, I wrote in a separate article: Can't share the Internet over Wi-Fi in Windows 10.
After these actions, it is advisable to stop the network that we launched, this is done with the following command:
netsh wlan stop hostednetwork

And then, start the network again with the command:
netsh wlan start hostednetwork
Everything should work. Turn on Wi-Fi on your device, and connect to the network we just launched. Here is a virtual Wi-Fi network launched by me in Windows 10 on a tablet:

If the network does not work, then restart your computer and start the network again. The command that I wrote about above.
How to manage Wi-Fi sharing from a laptop on Windows 10?
Every time after restarting the computer, when you want to distribute the Internet, you will need to start hotspot with the command:
netsh wlan start hostednetwork
To stop the network, run the command:
netsh wlan stop hostednetwork
And to change the network name, or password, run the command:
netsh wlan set hostednetwork mode = allow ssid = "help-wifi.com" key = "11111111" keyUsage = persistent
Changing the password and name to your own, if you like.
Create files for management
If we need to create a network only once, and when you want to change the network name or password, then you need to start the distribution after each shutdown of the computer. It is not very convenient to open the command line every time, copy the command and execute it. Therefore, I advise you to create two files: one to start the network, the second to stop it.
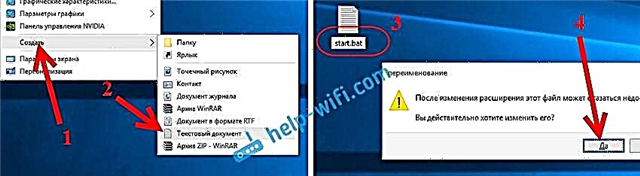
We do this: create a text file on the desktop, and rename it to start.bat... The file name can be anything. The main thing is that the expansion would be.bat.

Right-click on our .bat file and select Edit... Next, copy and paste the command into it:
netsh wlan start hostednetwork
We close the file, and be sure to save the changes in file.

That's all, now we have the start.bat file, by clicking on which (double click), the Wi-Fi distribution will immediately start. In the same way, you can create a file to stop the network. Name the file for example stop.bat and paste the command "netsh wlan stop hostednetwork" into it. After starting this file, the virtual network will be stopped.
If can't create .bat file, then see the solution here.
Update: if necessary, you can make the laptop start distributing the Internet automatically, immediately after turning it on. How to do this, I wrote in the article: Automatically start sharing Wi-Fi when you turn on the laptop.
What to do if the laptop does not distribute Wi-Fi, the Internet does not work, or the devices do not connect?
If you started the network on your Windows 10 computer, and you have problems with the launch itself, connecting, or accessing the Internet, then now we will try to deal with these problems.
- If there is any problem, then the first thing to do is restart your computer and check if you are running Command Prompt as administrator. It is important.
- It may be thatI can't create the network itself (the first command from this article). In this case, check if you have Wi-Fi enabled (I showed you how to do this at the beginning of the article). If there is no way to turn on Wi-Fi at all, then most likely you do not have the driver for the wireless adapter installed. Install the driver and try again.
If the driver is installed, but you still cannot start the distribution of the Internet, then try updating the driver on Wi-Fi. By downloading it from the manufacturer's website for your laptop model and OS. - If the network on the laptop is running, but devices are not connected to it... First thing, disable antivirus and a firewall (if any). Or other programs that might block the connection.
Also, check if you are entering the correct password. You can restart the network with a new password. And check out the tips from this article. - A very popular problem, when there is a network connection, all devices will connect fine, but Internet does not work, sites do not open... Solution: first of all, you need to check if the Internet is working on the computer from which you want to distribute the Internet. If everything is ok, then check the Internet sharing settings, which you should have set during the network startup process. See above for how we allowed the internet connection to be used.
Also, you can try to disable antivirus, firewall, etc. On this problem, I will prepare a separate article: distributed Wi-Fi from a laptop, and the Internet does not work "Without access to the Internet."
The error "Failed to start the hosted network. The group or resource is not in the required state ... "
A very popular problem when an error appears when trying to start a virtual network on Windows 10“Failed to start hosted network. The group or resource is not in the correct state to perform the requested operation ".

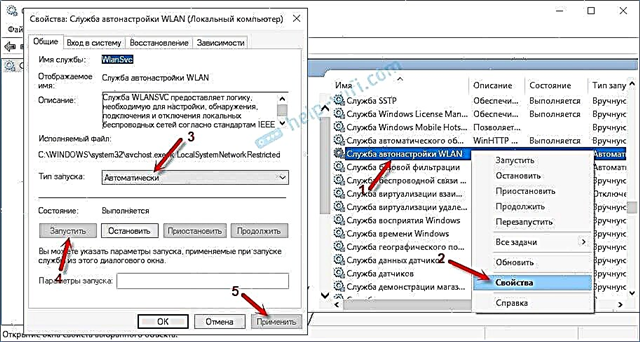
In the comments, Anton advised to do this: go to the device manager. Start - Parameters - Devices, and from below we choose device Manager... Next, in the manager, click on the tab View, and select the item Show hidden devices.

Open the tab Network adapters, we are looking for an adapter called "Microsoft Hosted Network Virtual Adapter", or "Virtual Hosted Network Adapter (Microsoft)" right-click on it, and select Engage.

After that, we try to start the network with the commandnetsh wlan start hostednetwork.
If you do not find such an adapter in the task manager, or you do not have any signs of Wi-Fi at all (for example, an item in the settings, a power button), then most likely you do not have the driver for the wireless adapter installed. Or, it just needs to be updated. It may be that the driver does not support virtual network. Check out this article. In it, I wrote about a similar problem. If you have run hotspot before, then there should be no questions in the case of Wi-F distribution in Windows 10.
Video: set up Wi-Fi distribution in Windows 10
I have prepared a small video in which you can see the launch of the access point in Windows 10 (choose the highest quality, and do it in full screen). By the way, this is my first video instruction, so please don't scold too much :)
If something didn't work out for you, or some points from the article remained incomprehensible, then write in the comments, I will try to help.