Hello! Not so long ago, I talked about setting up Wi-Fi distribution in Windows 10 via the command line. In this article, we will look at configuring a virtual network using a special program. There are many programs, free and good: Virtual Router Plus, Switch Virtual Router, MyPublicWiFi, MaryFi and others. In this article, I will show you how to configure Hotspot in Windows 10 using the programSwitch Virtual Router... A good, understandable program, there is a Russian language. Virtual Router Plus is still good, but requires the .NET Framework to be installed, and in some cases, this can be a problem. All of these programs are almost the same, and they are needed for one thing - to launch Wi-Fi distribution from your laptop. In our case, the laptop runs on Windows 10. I have not tested the operation of all programs on the top ten, but Switch Virtual Router works, and the rest, I think, will work.
It is important that a driver is installed on your laptop (or a computer with a Wi-Fi adapter) that supports running a hosted network (virtual Wi-Fi network). It is very easy to check this. Run Command Prompt as administrator and run the command:
netsh wlan show drivers
You will see information on the wireless adapter. Find the line there Hosted network support... If the opposite is Yes, then everything is fine, you can continue.

If there is no network support, then update the driver on Wi-Fi. Download for your laptop model from the manufacturer's website, and install. This article contains more information, however, using the example of Windows 7. On the "top ten" everything is the same.
Setting up Hotspot in Windows 10 using the program
It seems to me that configuring through the command line is much easier. You can try this instruction. You can also get confused in the program, but many users like the option of setting up the distribution of the Internet through a special program more.
As I already wrote, we will launch the virtual network using the Switch Virtual Router program. You can download it at this link. Install the program on your computer. Just run the installation file and follow the instructions. After installation, a shortcut to the program will appear on the desktop.
Launch Switch Virtual Router and click on the gear button to open the settings.

The main thing is to set the name of the Wi-Fi network that the laptop will broadcast, and the password to connect to your Wi-Fi. In field Router name (SSID) specify the name of the wireless network as you want. And in the field Password and Repeat password - enter a password. You will use it to connect your phones, tablets, and other devices to Wi-Fi. Enter a password of at least 8 characters. This data can then be changed.
Click the button Apply... A small window will appear in which click Ok... And press the button againOk in the program settings.

You can specify other settings. For example, launch a program with Windows starting. Or after starting the program, immediately launch the access point. This is optional.
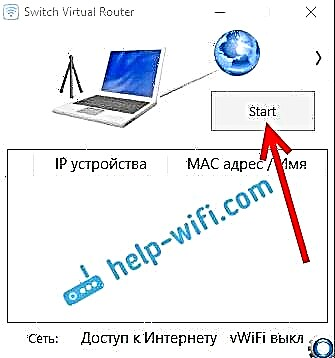
So, everything is set up. Now, in the main window of the program, click on the button Start.

That's it, the virtual network is running. The laptop already distributes a Wi-Fi network (with the name and password that we set in the settings), to which you can connect your phone or other device. By the way, all connected devices will be displayed in the program window.

But, the connection to Wi-Fi is, but internet probably doesn't work... Did you guess right? Let's fix it now. If your devices do not want to connect to the created network, then see this article below, I will tell you how you can fix this problem.
This means that we have connected to the created network, but the Internet does not work. It is necessary in the properties of your Internet connection, to open the general access for the network we launched. Now I'll show you how.
Please note that the Internet on your computer must work. If it doesn't work, then you need to fix it. If everything works, then you need to open public access.
Right-click on the internet connection icon (in the notification bar) and select Network Control Center ... In the new window, click on the item Change adapter settings.

Important! Right-click on the connection through which you have an Internet connection, and select the itemProperties... If the Internet is by cable, then this is most likelyEthernet, or some kind of high-speed connection with the name of your provider.
In the new window go to the tab Access, and check the box next toAllow other network users to use this computer's Internet connection. Below, from the list, select the adapter for which we allow. I have LAN connection * 1... Your figure may be different. To save, click Ok.

After these steps, it is advisable to restart the computer, start the Switch Virtual Router program again and start the network by clicking on the Start button... Connect to the created network, the Internet should already work.
Let's take a look at a few popular problems.
What if the devices do not connect to the created Wi-Fi network?
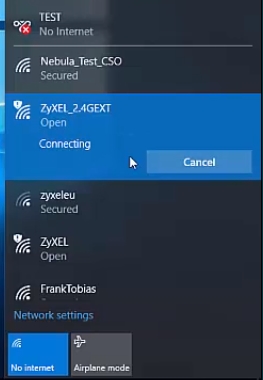
This happens very often. You started the network, on devices, it is displayed in the list of available networks, but when you try to connect, we see errors: "it was not possible to connect to this network", there is a constant receipt of an IP address, or just an endless connection.
In almost 100% of such cases, the antivirus is the culprit, or the installed firewall... Just turn them off for a while and check. My Dr.Web anti-virus always blocks such connections. I turn off the firewall built into the antivirus, and the devices are immediately connected to Hotspot. As a rule, you can disable protection by right-clicking on the antivirus icon and selecting the desired item in the menu.
You can also try changing the network name and password, and restart the Wi-Fi network on the laptop.
Everything connects, but the internet is not working
So we connect to the Wi-Fi network running on the computer, but there is no Internet connection. Also, a very popular problem.
You need to check the sharing settings, which I wrote about above. In the properties of your Internet connection, you must open public access to the Wi-Fi network that the laptop distributes. Look carefully, you may not have shared access for the adapter through which you have an Internet connection.
Also, check the Internet on the laptop itself. If all else fails, then restart the laptop and restart the network. You can also try disabling your antivirus.
I am thinking of preparing hotel, detailed articles on the most popular problems and their solutions that you can encounter while launching Hotspot on Windows 10.
If you cannot start the network through the program, then try using the command line (link to instructions at the beginning of this article). Write in the comments about your successes and failures in setting up a hot spot.