When I ordered cheap Wi-Fi adapters for PCs on AliExpress, which I wrote about in previous articles, I saw a large number of different Wi-Fi modules for laptops. I decided to order one WLAN module and replace it in my laptop. I will not say that I was not satisfied with the factory module installed in the laptop, or it somehow worked poorly. The main task was to write an article for the site. As it usually happens with me 🙂 But before that, of course, I decided to check everything.
First, let's find out what a Wi-Fi module is. In simple terms, this is a small board that connects to the laptop's motherboard (via the Mini PCI Express port) and adds Wi-Fi support and, as a rule, also Bluetooth. That is, this module alone allows you to connect your laptop to Wi-Fi networks, and connect other devices to your laptop via Bluetooth. I can’t say that Wi-Fi and Bluetooth work through one adapter on all laptops (there are a lot of them), but in most cases this is the case.
Why change the Wi-Fi module? I have identified two main reasons:
- The first is, of course, a breakdown. This does not happen often, but it does happen. Yes, you can replace it with a USB Wi-Fi adapter. I wrote about this in the article How to replace the built-in Wi-Fi module. But this solution has many drawbacks. For example, an external adapter takes up a USB port and sticks out of the laptop case. Which is not very convenient.
- The second reason is the installation of a more productive, modern and faster module. There are many old (and not so) laptops that do not even support 802.11n, let alone 802.11ac (5 GHz). This severely limits the speed of the wireless connection. In this case, we can simply replace the outdated WLAN module with a newer one. And even get support for the 802.11ac standard and the ability to connect to wireless networks at 5 GHz. At the same time, you can solve the problem with the outdated Bluetooth standard. For example, if your laptop has Bluetooth version 2.0, then you can install a new module with BT version 4.0.
I don't have much experience in disassembling laptops, but as I understand it, in laptops, nettops and all-in-ones, the WLAN module is always (or almost always) connected via the Mini PCI Express slot. Therefore, when choosing a Wi-Fi module for a laptop, you must focus primarily on the connection interface. Well, on the supported wireless standards. Wi-Fi network operating mode and Bluetooth version. If you are not sure that your laptop has a Mini PCI-E connection, then you can disassemble it and see.
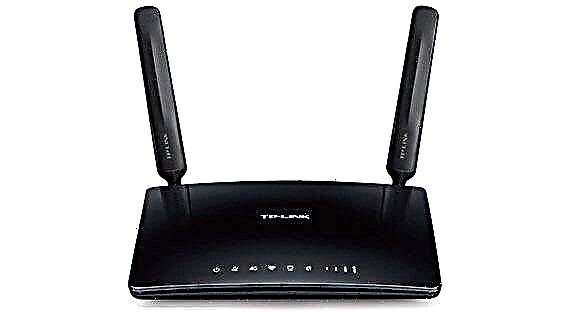
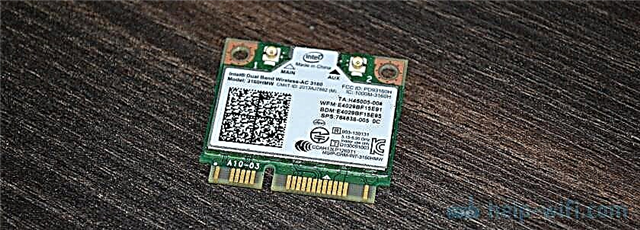
In my case, already quite old (2012) laptop ASUS K56CM. A wireless module with support for Wi-Fi 802.11n (up to 300 Mbps) and Bluetooth version 4.0 was installed in it. We will change it to the Intel Dual Band Wireless-AC 3160 (3160HMW) module. Supports 5 GHz band and 802.11ac standard. BT in it is also version 4.0. It looks like this:

Important! When choosing a Wi-Fi module in the same online store AliExpress, always read the description carefully. Usually sellers write for which laptops this module is suitable, and for which it is not. For example, in the description of the Mini PCIe adapter that I bought, it was written that it is suitable for almost all laptops except Lenovo, HP, ThinkPad and IBM. It is unlikely that someone will be able to specifically answer you whether a particular module is suitable for a particular laptop model.
There are laptops in which there is no way to replace the WLAN card. There is some kind of binding in the BIOS, and the laptop only works with the card installed at the factory. This is very common in devices from HP.
As you probably already understood, there are a lot of nuances in matters of choice and compatibility. No one here will advise you on a specific module. Search, see, read the description. Honestly, I didn't choose much. I ordered almost the first adapter that caught my eye. The only condition for me was support for the 802.11ac standard. I was lucky and it worked.
Replacing the built-in laptop Wi-Fi and Bluetooth module
I will show on the example of a laptop from ASUS. But the instructions are also suitable for other manufacturers: Lenovo, Acer, Samsung, Hewlett-Packard, DELL, etc. Of course, the disassembly process, the location of the wireless module itself inside the laptop, appearance and other details will be different.
We only need a small Phillips screwdriver that is suitable for disassembling your particular laptop.
Important! Turn off the laptop, unplug it, and remove the battery. If it is removable in your case. On many newer models, the batteries are not removable.
Flip the laptop over and see if there is a separate cover. Almost every laptop has a small cover on the bottom, unscrewing it, you can get access to the hard drive, RAM, and if we're lucky, to the Wi-Fi module.

But more often than not, the WLAN module is hidden by the mod's main cover. As in my case. So you need to completely disassemble the laptop.
Important! Most likely, the bolts will be of different lengths. It is advisable not to mix them up so that there are no problems when assembling the laptop.
We unscrew all the bolts and completely remove the bottom cover of the laptop. Be careful, don't rush. If the cover does not come off, then you may not have removed all the bolts. Also note that wires can go to the cover. In my case, it was necessary to disconnect a small connector that went to the switch that blocks the battery.
We see the Wi-Fi module, which is connected to the Mini PCI Express port on the laptop motherboard.

There are two wires connected to the module itself. Usually there is one white and the other black. These are Wi-Fi antennas. We need to disconnect them.
Before disconnecting the antennas, it is advisable to take a photo, record, or remember how they were connected.
They are filmed very simply. It is enough to pull them up. You can carefully remove them with a screwdriver.

Then we unscrew the bolt with which the Wi-Fi module is fixed and remove it.

Under the module itself we see the inscription "WLAN" on the motherboard. In order not to miss when installing a new one 🙂

We insert our new wireless module into the Mini PCIe port. We fasten it.

Next, you need to connect the antennas. As you can see, the antenna connectors are marked with numbers 1 and 2, triangles (one sketched, the other not) and the inscriptions MAIN and AUX. It is necessary to connect the antennas as they were originally connected.
There is such a mess with these wires from antennas, designations, connection options, etc., that you can't even imagine. Later in this article I will talk about this in more detail. At least I'll try to tell you 🙂
I connected like this: black wire - AUX, white wire - MAIN... There are no problems with the signal. Make sure the connectors on the wires are firmly seated. But there may be problems with the signal. It is not uncommon for a laptop to catch Wi-Fi very badly, or does not see wireless networks at all. This happens especially often after cleaning the laptop from dust. When it is bad, whether the antennas are connected incorrectly. Or when the cable that goes to the antenna is frayed. The antennas are usually located under the screen cover.

That's it, the replacement of the Wi-Fi module is complete. Putting the laptop in reverse order. Check if everything is connected and screwed on. Be careful.
You may need to install drivers after replacing the module. I'll talk about this at the end of this article. And now again about antennas.
How to connect antennas: AUX and MAIN, black and white wire
I decided to make a separate section, and try to figure out the issue of connecting Wi-Fi antennas.
I can give very good advice right away. Connect the way it was originally. If the reception is poor, or the laptop will not see the Wi-Fi network at all, then try connecting the other way around.
I connected the wires in the same way as on the factory adapter. But my laptop has already been repaired, and it is possible that the wires were not reversed. After replacing the module, my Wi-Fi network reception level increased significantly. I don’t know what it’s connected with. Maybe there was bad contact before.
Almost always in a laptop there are two wires to the Wi-Fi antennas. White and black. It happens, however, that both wires are the same color. In this case, they may have stickers on them.
The module itself must be marked:
- Number 1 and 2. As I understand it, these are just signed connectors for the first and second antenna. And there is also information that 1 is MAIN, and 2 is AUX.
- Black and white triangle. In fact, it is not black and white, but sketched and transparent.
- MAIN and AUX (or ALT) labels. Already sort of figured out that MAIN is the main antenna, and AUX is an additional one.
Something like this:

When I started to figure it out, read information on forums, other sites and on YouTube, I was just shocked. A lot of different information. About everything, but nothing in particular 🙂
Someone connects the white cable to MAIN and the black cable to AUX. Someone on the contrary. In general, everything works for Vasya with any connection and a good reception, but for Petya's laptop does not catch Wi-Fi if the wires are swapped. Or the speed is bad. And most importantly, I have not found any specific information anywhere. Even ASUS support cannot give an exact answer on what to connect to.
It is believed that the second antenna is for Bluetooth, but it is not. Most likely, two antennas are used for Wi-Fi at speeds of 300 Mbps and higher. Or for MU-MIMO theology work.
However, we should not worry about this. If the signal level is good (not worse than before the module was replaced) and the connection speed is not worse than on other devices, then you have connected everything correctly. If, after replacing, the signal and speed indicators have dropped, then disassemble the laptop again and swap the wires. I was too lazy to disassemble the laptop again to check what all the same affects (and whether it affects at all) the order of connecting Wi-Fi antennas. Perhaps I will check it all the same and supplement the article.
Possible problems after installing a new module
As a rule, there is only one problem - the lack of drivers. In my case, Windows 10 installed the drivers itself. Wi-Fi and Bluetooth.

I just updated them later, because on the Intel website (I have a module manufactured by Intel) there was a new version of the driver.
But in Windows 7 (installed on the same laptop as a second system), only the Bluetooth driver was automatically installed. The Wi-Fi adapter was displayed as an unknown "Network controller" device.

You just need to download and install the required driver. There are two options:
- Type in a Google or Yandex search the name of the module itself, for example, "Intel Dual Band Wireless-AC 3160", find the official website of the company (in this case, Intel) in the search and download the newest driver. After that, start its installation.
- Find the driver by hardware ID. I wrote about this in detail in the article Network Controller and USB2.0 WLAN. How to download a driver and what is it?
If, after replacing the built-in wireless module, the laptop does not see the Wi-Fi network (red cross and the status "No available connections"), then first look at this article. If it does not help, then disassemble the laptop and check if the antennas are connected. Maybe the connector was badly connected, or all the same the wires were swapped.
In the comments, you can always ask me a question, or add useful information to the article.