You can control the TP-Link router not only by connecting directly to the router itself via cable, or via Wi-Fi, but also via the Internet. This means that you can access the router settings from anywhere. Even if your router is at home, and you are in another city, or in another country. We only need internet access. You also need to prepare a TP-Link router in advance for remote management. How to do it? See this instruction, now I'll show you everything. Why is this necessary at all? There are different situations, and sometimes it is necessary to be able to remotely change the settings of the router, manage the connected devices, reboot the router, etc.
There are two ways to get remote access to your TP-Link router:
- Through TP-Link ID cloud service. This is a very simple method that works regardless of what kind of Internet you have, what external IP address is issued by your ISP, etc. The connection is made through the cloud service of TP-Link. You can control it from your phone or tablet through the TP-Link Tether app. If you need access through a browser (from a computer, etc.), you can get a unique address for your router (using TP-Link DNS). And use this address to access the web interface of the router from any device, wherever you are. The only negative: not all routers support cloud functions. It would be more correct to say that, at the moment, only a few new (and usually expensive) routers support the "TP-Link Cloud" function (Archer C8 V3, Archer C9 V3 and V4, Archer C3150 V2, etc.). The best way to check is to go to Settings and see if there is a TP-Link Cloud section there.
- Via external IP address (or DDNS). The router receives an external IP address from the provider. I think you can say that this is the unique address of the router on the Internet. Using this address, you can go to the settings of the TP-Link router via the Internet. This method works on almost all routers. But there are several important points. The ISP should give you a white, not a gray external IP address (more on this later in the article). Well, it is also desirable that the external IP address is static (does not change). But if you even have a dynamic (but white) external IP address, then you can configure DDNS and everything will work.
First, we will consider a more universal method that will suit almost everyone (the second method, which I wrote about above). And then I'll show you how to set up remote access to a TP-Link router through their proprietary cloud service. If you are lucky and your router supports this feature.
Access to the settings of the TP-Link router via the Internet (via IP or DDNS)
To understand how it all works and quickly set everything up, you first need to find out what IP address your Internet provider gives to the router. White or gray. Static or dynamic. And if dynamic IP address problem is solved by DDNS setting, then when the provider issues a gray WAN IP address, there is no way to configure remote access.
In the article DDNS (dynamic DNS) on a router: what it is, how it works and how to use it, I talked about this in more detail and showed in detail how to find out if an Internet provider is issuing a white or gray IP address. If you do not know what address your provider gives out, then follow the link above and determine.
Then we act depending on the results obtained:
- If you have a gray external IP (the WAN IP address that does not match in the router settings with the one displayed on the 2ip.ru website), then only one solution - order the "static IP address" service from your provider. If such a service is available. Usually, this service is paid.
- If you have a white external IP address and it is dynamic, then everything will work according to the instructions below. But the settings will not be available when the ISP issues a different IP address, since it is dynamic. Decision: configure DDNS on a TP-Link router, or order the "Static IP Address" service from your provider.
- If the external IP is static (and, accordingly, white). In that case, everything is fine. Follow the instructions below.
Open your TP-Link router settings and go to the section "Protection" – "Remote control"... We need to allow remote access to the router.
We do not change the port, but in the "IP address of remote control" field, you need to register the external IP address of the device for which remote access to the router settings will be allowed. Or allow access for all devices.
- 0.0.0.0 - remote access to the router is denied.
- 255.255.255.255 - general access is available for all devices (with different addresses).
- A specific IP address. Example: at work, our computer (from which we will remotely control the router) has a static external IP address (for example, 158.12.63.89). We write this address in the field "IP-address of remote control" and in the future remote access to the router will be available only for devices with the IP-address 158.12.63.89.
If you do not know the permanent IP address of the device from which you will remotely control the router (or it is constantly changing), or you will be logging in from different devices, then write 255.255.255.255.

Don't forget to save your settings with the "Save" button.
On routers with a new control panel (which is blue), you need to go to the section "System Tools" – "Administration"... There, in addition to the IP address (from which you can access the router via the Internet), you can also register the MAC address of a specific device. It is also necessary to put a tick next to "Enable" and save the settings. An empty "IP / MAC-address" field means that access will be open to all devices.
Important! We have opened access to our router from the Internet. To protect its control panel, be sure to set a strong password that will protect your router settings. I also recommend setting a different username (do not use the factory admin). This can be done in the "System Tools" - "Password" section. Or "System Tools" - "Administration" ("Account Management" tab) on new firmware.

More information in the article: how to change the password on a router from admin to another.
To open the settings of the TP-Link router via the Internet from any device, you just need to find out your WAN IP address (which the provider issued to this router). It can be viewed on the main page of the router's web interface, on the website 2ip.ru, etc.

You need to go to this address in any browser and from any device that is connected to the Internet (provided that in the remote access settings you have allowed access for all addresses). If it doesn't work, then type this address via http: // and at the end add the port (80 if you haven't changed it) separated by a colon. It will turn out something like this http://188.69.89.45:80
You need to specify the login and password of the router administrator. After which we will get access to the web interface.

Let me remind you that if the router receives a dynamic IP address from the provider (that is, the provider does not have a permanent IP address assigned to your contract (or the address of your house, apartment)), then it may change. Accordingly, after changing the IP address, there will be no access to the router at the old address. This can be solved by setting the "Dynamic DNS" function.
After configuration, you will receive a permanent Internet address that you can use to enter the router settings via the Internet. Also, this address can be used for remote access to the FTP server.

A direct IP and DDNS solution works great. I checked everything on my router. There are not many settings, but it's all a bit confusing. Especially these IP addresses are tricky to deal with. If you encounter any problem - describe it in detail in the comments. I will try to suggest a solution. And don't forget that your ISP also has a support service.
Remote control via cloud service (TP-Link ID) and Tether app
First you need to open the router settings and go to the section "Basic settings" – "TP-Link Cloud"... There you need to go to the site tplinkcloud.com (click on the "Register now" button) and register your account. Be sure to save the mail and password that you provide during registration.
In the same section "TP-Link Cloud", in the router settings, you need to log into your TP-LINK Cloud account. For the router to be linked to your account.

This is how the settings look after logging into your account and linking the router.

You can unlink your account from the router. Or bind one more, or several accounts (for general remote access to the router).
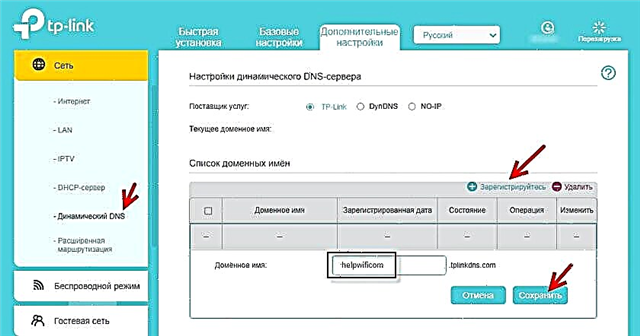
Next, you need to go to the "Advanced settings" - "Network" - "Dynamic DNS" section and register a permanent address for the router in the TP-Link DNS service.

Important! Do not forget to enable remote access in the "Administration" section. At the beginning of the article, I talked about this in more detail.
The address registered above can be used to access the router from any device via the Internet.

Enter the email address and password that was specified when registering an account on the TP-LINK Cloud website and get full access to the router's web interface.
Tether app
Install the TP-Link Tether application on your phone or tablet, which I talked about in this article. With it, you can manage a large number of different models of TP-Link routers. But only over a local network (when your device is connected to a router).
But, if your router supports the TP-Link Cloud function and you have already linked the router to your account, as I showed above, then it is enough to log into your TP-LINK Cloud account in the Tether application.

The router will appear as "Cloud Device" in the device list. And we can manage this router even when the phone is connected to the Internet via a mobile network, or via a Wi-Fi network elsewhere.