In this tutorial, I will show you how to connect a computer outlet yourself. This is an RJ-45 network socket. These sockets are used to connect devices to an Ethernet LAN. Now these sockets are not very relevant, since there is Wi-Fi, and almost every device has a built-in Wi-Fi module, or the ability to connect an external wireless module. So in most cases, you can create a local network with Internet access without wires, connectors, sockets and all that. But nevertheless, many in houses, in apartments lay a network cable, install network sockets and use them to connect various devices to a router or modem. And in some cases, it's better to use a cable connection rather than Wi-Fi.
The main feature is that connecting any device (be it a PC, TV, game console) to a router via a cable will work much more stable and faster than a Wi-Fi connection. With Wi-Fi, there are very often different problems: a weak signal level, low speed, something constantly disconnects, flies out of the network, etc. With a cable, everything is much easier - it is connected and working. Comes from the provider 100 Mbit / s and the device will also receive 100 Mbit / s via the cable from the router. You can build a gigabit network without any problems, and at least in your home network you will have a speed of 1 Gb / s between devices (provided that you have a router and a device (client) with gigabit ports).
Most often, network outlets are used in the following scheme: during the repair process, a network cable (twisted pair of CAT5E category) is laid from the intended place of installation of the router (most often it is a separate panel in the corridor, inside the apartment) in different rooms. Where computers, televisions and other devices will be installed that will connect to the Internet. Power outlets are usually installed near regular outlets. But the twisted pair cannot be laid together with electrical wiring (in one channel). At one end (near a router or modem), the cable is crimped into an RJ-45 connector, and network outlets are installed in the rooms. Further, the Internet (cable from the provider) and Internet sockets (to LAN ports) are connected to the router. After that, in different rooms of a house or apartment, we get the opportunity to connect to the router via cable.
This is very important primarily for TVs. Yes, now almost all Smart TVs come with built-in Wi-Fi. But it does not always work stably, on many TVs there is no support for 5 GHz, and in the 2.4 GHz band, as a rule, there is not enough speed to watch videos in high quality. It's the same with video game consoles. To personal computers, if you have them, I would also advise laying a network cable and installing computer sockets. Especially if you like to play online games. Gamers will agree with me that cable ping is generally lower and the connection is more stable.
Most often, specialists are called in to lay network cables and connect outlets. I will not argue that they will most likely perform the installation of a computer network faster and better. But if you do not have a complex network, you have at least some experience and understanding of how it all works and works, then you can handle it yourself. And I will try to help you with this.
Preparing to install a wall outlet
In this article, we will focus specifically on built-in sockets, since there are also external ones (for outdoor wiring when the cable is not laid in the wall). But the order and the very scheme of connecting external sockets is about the same. First you need to buy the computer socket itself. You can take any. If you want something better, more beautiful, and usually easier to install, don't save (don't buy the cheapest). I have a Makel socket. Inexpensive. Something around 130 UAH. (340 rubles). There are many more good options from Schneider, Legrand, VIDEX, VIKO, Werkel, Lezard. There are double sockets, with and without frames. Here is mine:

A twisted-pair cable of CAT5E category, or more advanced Cat.6, is laid to the outlet. This is a four-pair shielded cable. The socket must match the cable category. There is this information on the outlet. I have a CAT5E cable and a CAT5E socket too. The maximum cable length is 100 meters.

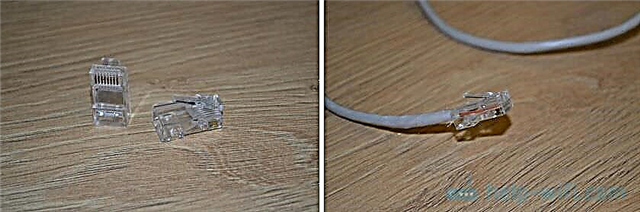
So, on the one hand, the cable is connected to a computer outlet, and on the other hand, it is usually crimped into an RJ-45 connector, and connected to a router, modem, switch.

In this article, I will not write about how to crimp a network cable. We already have two instructions on this topic:
- How to Compress Twisted Pair to RJ-45? DIY network cable
- How to crimp a network cable without a tool (screwdriver)
And this article may also come in handy: how to lengthen an Internet cable (network cable).
All this networking equipment can be purchased at specialized stores. Also computer sockets, network cables, connectors are usually sold in digital stores.
The mains cable should be routed into a regular socket. In which, after connection, our socket will be installed and fixed. If you have not laid a network cable yet, but are going to do it, then leave some cable reserve. It seems like 1 meter is recommended. But it seems to me that this is a lot. I think 50 centimeters will be more than enough.
One more thing: the method of connecting the wall outlet may differ depending on the manufacturer. It is the very process of connecting a twisted pair and its fixation (clamp) in the socket module. No special tool is required to connect these outlets.
How do I connect the wall outlet?
For ease of connection, you can pull out the module from the socket housing itself, and after connecting, insert it back. In the case of my Makel socket, you need to unscrew the bolt and remove the front cover. Then use a screwdriver to press down on the plastic catch and push the module out of the socket housing. But this is not necessary, you can connect the socket and assembled.

Then we remove the outer insulation from the cable. About 4-5 centimeters.

We untwist and align the wiring in accordance with the crimping scheme. The crimping scheme should be in the instructions with the outlet and on the outlet itself. There are two circuits: 568A and 568B. Typically 568B is used. You can read more about crimping schemes for a network cable in this article.

Further, on the socket (module), we remove the fixing bar and fold back the plate that will clamp the contacts.

We insert the twisted pair wiring into the holes in accordance with the crimping scheme and clamp them tightly with this cover. Then you can insert the locking bar.

You can install the module back into the socket housing (if you removed it).

Everything is ready! You just need to hide the power cable in the socket, insert the outlet there and fix it (like a regular outlet, switch). Further to this outlet, you can connect devices. For example, a computer for this instruction.
The whole process of connecting a computer outlet is reduced to the fact that you need to insert the twisted pair wiring in accordance with the crimp scheme and fix them. Nothing complicated. Be sure to leave comments!