In this article, I will show you how to set up a guest Wi-Fi network on Tp-Link routers. But not all Tp-Link routers have this capability. As far as I understand, the guest network is available only on Archer devices. That is, on such popular models as TP-Link TL-WR741ND, or TL-WR841ND, the guest network cannot be started. In this regard, Tp-Link needs to catch up with its competitors. For example, on ZyXEL Keenetic devices, this function is present even on the cheapest models. Well, okay, better late than never 🙂
I will show the Guest Network setting using the example of the Tp-Link Archer C20i router. For those who are not in the know, a guest network is an additional wireless network that your router will distribute. She will have a different name and password. It is a guest one because it is created for your guests, clients in your office, cafe, etc. And it differs in that it is completely isolated. This means that devices that are connected to the guest network will not be able to access the local network, access to a shared printer, or a drive (if you do not allow it in the settings). It makes sense to create such a network when you give your neighbor access to Wi-Fi.
You can also configure the work of the guest network on a schedule. For example, so that the guest Wi-Fi works only during business hours. Or, run the network for a few hours, or minutes, after which it will disappear by itself. And one more thing, you can adjust the bandwidth. That is, limit the Internet connection speed for the guest network.
Turn on and configure guest Wi-Fi on Tp-Link
We connect to the router using a cable, or via Wi-Fi, open a browser and go to 192.168.1.1, 192.168.0.1, or http://tplinkwifi.net. Depends on your model. The address is indicated on the sticker on the bottom of the router. You will be prompted for a username and password. The default is admin and admin. Perhaps you or someone else has changed this data. If necessary, I give a link to detailed instructions for entering the router settings.
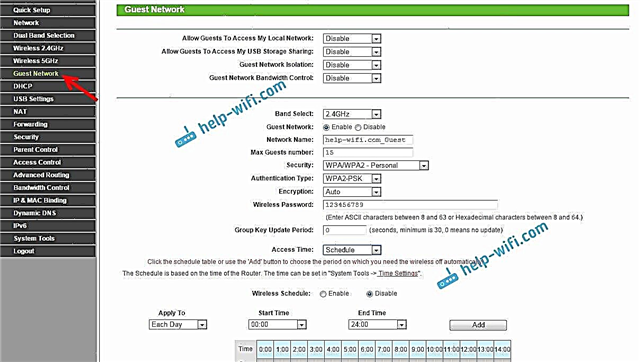
Go to the tabGuest Network... And then we set the following parameters:
- Allow Guests To Access My Local Network: This is the access of guests to the local network. Disable - Access is closed.
- Allow Guests to access my USB Storage Sharing: Sharing USB storage. We set Disable, and everyone who connects to the guest network will not be able to access it.
- Guest Network Isolation: isolation from other Wi-Fi clients. Leave Disable.
- Enable Guest Network Bandwidth Control: Limit internet speed for guest network clients. If you put Disable, then the speed will not be limited. If you want to limit the speed for your guests, then put Enable, and follow the link that appears on the side, where you can configure the limitation. I will show you how to do this below.
- Band select: if you have this item, then there you can choose at what frequency the guest Wi-Fi will work. At 2.4GHz, or at 5GHz.
- Guest Network: put a tick next to the itemEnable, thereby turning on the network. If you want to disable it, just set Disable and save the settings.
- Network Name: set the name of our guest network. You can name it the same as your main network by simply adding "_Guest" at the end.
- Max Guests number: You can set the maximum number of clients in the guest network.
- Security: if you leaveDisable Wireless Securitythen the network will be open, no password. To close it with a password, selectWPA / WPA2 - Personal.
- Then we set the security parameters as I have in the screenshot below, and in the fieldWireless password write a password for the Wi-Fi network. Minimum 8 characters.Group Key Update Period: leave 0.
- Access Time: if chooseTimeout, then you can set the time for how long the guest network will run. For example, if you want the network to work for 2 hours. And if you chooseSchedule, then the network will always work. Or according to the graph that appears below. I will write in more detail below on setting up the schedule.
That's it, click at the bottom of the page on the button Saveand our Wi-Fi network for guests will start working. I didn't even highlight all the settings in the screenshot, otherwise there are a lot of arrows 🙂 To enlarge the picture, click on it.

Remember to save your settings. Let's take a closer look at setting up Internet speed limits, and turning on / off the network on a schedule.
Limiting the Internet speed of the guest Wi-Fi network
For this, opposite pointEnable Guest Network Bandwidth Control select Enable, and follow the link to set the limitation.

Then you just need to check the box next toEnable Bandwidth Control... In fieldEgress Bandwidth set the maximum unloading speed, and in the fieldIngress Bandwidth set the maximum download speed from the Internet. All this in Kbps.

Click on Save to save the settings.
There you can still create rules, I did not delve into this. Not a very useful function.
Configuring the work of the guest network on a schedule
Be sure to go to the tab firstSystem Tools - Time Settings and correctly configure the time, date and time zone in your router.
When you are opposite the pointAccess Time selectSchedule, then the network will always work. A graph will appear below. So, in order to set up work on schedule, you still need toWireless Scheduleput a mark next toEnable... Enable work on schedule and then just customize it.
There are times and days on the schedule. Just select those cells that correspond to the time at which the guest network should work. Or select all cells with the button Add, and remove unnecessary ones. I think you can figure it out, nothing complicated.

After setting up, don't forget to click on Save to save the settings.
If you have Tp-Link with a new settings page. For example, Archer C9
There are already models of Tp-Link routers on which a new, beautiful control panel is installed. In blue tones. There you can already select the Russian language and configure the guest network on the Additional settings tab - Guest network. It looks like this:

Nothing new, it's just that everything is much simpler, clearer and more beautiful. It's time to introduce such a control panel to all of your routers.