In this article, I will show you how to change DNS server addresses on devices that run on iOS. This is our iPhone and iPad. You probably immediately had a question: why should I do this? Yes, if the Internet on your iPhone works without problems, then the DNS addresses can not be changed. But very often there is a situation when the iPhone or iPad is connected to a Wi-Fi network, but the Internet does not work. There may be a DNS error in the browser.
You can simply change them to public DNS servers from Google. They are kind of faster and safer. Now I'll tell you in a nutshell how it works. DNS servers are used to convert the textual website addresses we are used to into addresses that consist of numbers. When we type the address help-wifi.com in the browser, the first thing the provider's DNS server converts this address into the IP address of the server on which the site is located and loads it. This is by default the DNS server of our internet provider. But when it stops working, the Internet does not work on our iPhone. Google has free DNS servers that anyone can use. They work stably. All that is needed is simply to register these DNS addresses from Google in the Wi-Fi network settings. I wrote more about these public servers in the article: 8.8.8.8 - what is the address? How to replace DNS with Google Public DNS.
I also decided to make a separate article, where to show in more detail the process of changing DNS on iOS devices. I'll show it using the iPhone as an example. It's the same on iPad.
How to register your DNS on iPhone?
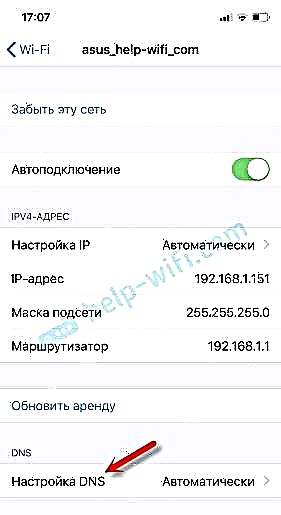
Go to the settings, to the Wi-Fi section and click on the Wi-Fi network for which you want to change the DNS addresses.

Then click on the "DNS Settings" item.

We put a tick next to "Manual". Click on "Add Server" and enter 8.8.8.8... Then click on "Add Server" again and add another one - 8.8.4.4... And next to the standard server (which is the first in the list), click on the red button and select "Delete". And at the top, click on "Save".

After saving the settings, our iPhone will start using the DNS servers, the addresses of which we registered in the settings. If it doesn't work right away, you can also turn Wi-Fi off and on. Or flight mode.
If you also have a DNS error on your computer, then see the article: DNS server does not respond in Windows 10, 8, 7. We also changed addresses there.
In the event that the Internet on the iPhone has not started working, or you have another problem, then I recommend looking at other solutions in the article: iPhone or iPad does not connect to Wi-Fi, the Internet does not work.
You can return the automatic DNS setting to iOS by simply checking the box next to the "Automatic" item in the settings.