Hello! In this short tutorial I will show you how to manually register an IP address in Windows 7. This can come in handy when you need to manually enter an IP address, subnet mask, default gateway, or DNS address in your network connection settings. In the properties of the TCP / IPv4 protocol. Simply put, when you need to set static addresses for a network cable connection, or a wireless Wi-Fi connection.
The process itself in Windows 7 is practically no different from the same Windows 10, but I decided to make a separate instruction strictly for Windows 7. So that no one gets confused, and the instruction is simpler.
Why manually register addresses with the properties of network connections? There can be many options here.
- If the Internet is directly connected to your computer (without a router, modem), and the provider issues a static IP address, then you need to register it in the properties of the local network connection. Otherwise, the internet won't work. However, nowadays not so many providers issue static addresses. More often than not, the computer obtains an IP address automatically.
- If you connect your computer to the Internet via a router, or a modem (via Wi-Fi, or a network cable), then static addresses are most often prescribed in the case when the computer does not want to connect to the router. Cannot get an IP address ("No network access" error). I wrote about these problems in separate articles. You can see an article with solving problems when connecting via cable and Wi-Fi network.
- There may be other reasons as well. For example, when the network is built in such a way that the router does not automatically distribute addresses (the DHCP server is disabled). Or when port forwarding is configured and your computer is assigned a static IP address.
I want to note that in the properties of the TCP / IPv4 protocol, by default in Windows 7 there is automatic obtaining of IP and DNS. For LAN and wireless connection.
Manually set the IP address, subnet mask, default gateway in Windows 7
Open the "Network and Sharing Center". And go to the "Changing adapter parameters" section. The icon with the status of the Internet connection (on the notification panel) you may have a different look. It does not matter.

Next, right-click on the adapter for which you want to assign static addresses. If the connection is via Wi-Fi, then "Wireless Network Connection". If by cable, then "Local Area Connection". We select "Properties".

Select the item "Internet Protocol Version 4 (TCP / IPv4)", and click on the "Properties" button.

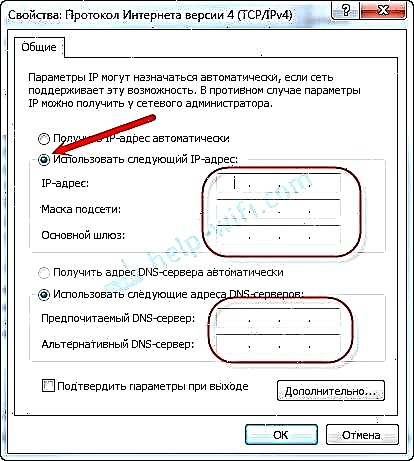
A window will open in which we can register static addresses: IP address, subnet mask, default gateway, DNS address. Most likely, you have set up automatic receipt of addresses there. Just put the radio button next to "Use the following IP address". The fields for filling will become active, and we can specify addresses. You also need to register DNS.

I think you know what addresses you need to specify. If not, I'll explain a little now. If your Internet is connected directly to your computer, then all the addresses you need to check with the provider.
What addresses should I register if I connect via a router?
In order:
- IP address you can write something like this: 192.168.1.35 (the last digit is arbitrary, preferably from 30 to 255). But, it all depends on the IP address of your router. As a rule, you can see it on the case of the router itself. It can be 192.168.1.1 or 192.168.0.1. If you have the last option, then you need to register something like this: 192.168.0.35. That is, the penultimate digit changes from "1" to "0". It all depends on the address of the router. If you don't know how to find it, then there is a little information in this article: https://help-wifi.com/sovety-po-nastrojke/192-168-1-1-ili-192-168-0-1-zaxodim -v-nastrojki-wi-fi-routera /
- Subnet mask will be registered automatically: 255.255.255.0.
- In field Main gate set the same IP-address of the router. Most likely it is 192.168.1.1, or 192.168.0.1.
- Preferred DNS ServerandAlternative DNS server... Here you can also register the address of the router. But I would advise you to register DNS from Google: 8.8.8.8 / 8.8.4.4. This often helps to solve the problem when some sites do not open, or when the error "Cannot find the DNS address of the server" appears.
It will all look something like this:

Click "Ok". Well, it is advisable to restart your computer.
In exactly the same way, we can set the automatic acquisition of IP and DNS addresses back.
I hope you succeeded. If anything, ask questions in the comments!