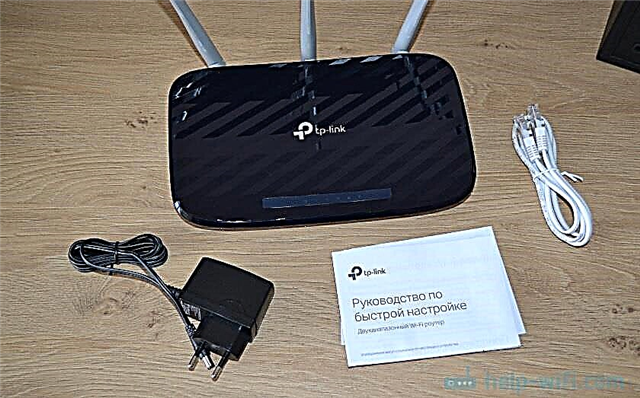
In this article I will try to tell you in detail, and by example show the process of setting up a TP-Link TL-WR845N router. This is a special router model. And I'm sure this router will be very popular in the near future. It is already selling well now and is collecting a lot of reviews. Why did I decide that? And all because TP-Link TL-WR845N replaced the very popular TP-Link TL-WR841ND model. Which, as I learned today, is already out of production.
TL-WR841ND is a really popular and popular model. I had the same router that has been working without problems until now (for more than 5 years). But TP-Link probably decided that this model was already outdated. It has been updated many times, though. There are more than 10 hardware versions. And the new model TP-Link TL-WR845N has been released to replace the budget, reliable and proven router. Which should take the place of the best, inexpensive router for your home or apartment.

This is the same budget router that attracts many with its price. The new model received an updated, high-quality housing and three antennas. Of course, the hardware (chipset) was updated, which had a positive effect on the performance of the router and the speed of the Internet connection.
I can only say that the capabilities of this router (in terms of performance, Wi-Fi network coverage, functions) will be enough for about 90% of all users. Well, for that price, it's the perfect low-cost router for your home. A very good replacement for the legendary TL-WR841ND 🙂
As for the process of configuring this router, it is no different from configuring other models from TP-Link. Judging by the information on the official website, there are already three hardware versions of the TL-WR845N. I have the first hardware version, and the control panel there is normal, green. And the third hardware version has a slightly updated web interface. However, all the tabs and settings there remained the same. The color and design just changed a bit. I will show using my router as an example.
How to connect TP-Link TL-WR845N and go to settings?
First of all, we need to install the router, connect the Internet to it, connect to it from the device from which we will configure, and go to the control panel. Where we will set all the necessary parameters: Internet connection, Wi-Fi network setup, password setting.
If you have a stationary computer or laptop with LAN, then at the time of setup, I would advise you to connect to the router via a network cable, which you will find in the kit (if you want to configure via Wi-Fi networks, from a laptop, smartphone, tablet, then I'll show you what to do below).
Connect a cable from a computer or laptop to the yellow LAN port. And into the blue WAN port, we connect the cable from the Internet provider (or modem). And of course, connect the power adapter, and turn on the router with the button (if it is disabled) so that the indicators light up.

Wi-Fi setup
Immediately after turning on the TL-WR845N, it will broadcast a Wi-Fi network with something like this name: "TP-Link_3A08". You can connect to this network from your laptop, smartphone, tablet, or other device. You need a password to connect. Factory the password is indicated on the bottom of the router on the sticker... Signed as "Wireless Password / PIN".
After connecting, you can enter the router settings from any browser (see below). It doesn't matter what device you have. If you do not have a computer, then perhaps another article on how to set up a Wi-Fi router from a tablet or phone will be useful to you.
This router supports control through the cool Tether app. Which you can install on your phone or tablet. With this application, you can configure the router and control its various functions. I wrote more about this application in the article: TP-LINK Tether program: configuring and managing a Tp-Link router.
If the router is not new, or they have already tried to configure it, then I strongly advise you to do a factory reset. To do this, it is enough to hold down the Reset button, which is recessed into the case, for 10 seconds. You can press it with something sharp.

The router will reboot and we can continue with the configuration.
Login to the control panel
The main thing is to go to the router settings. Many people have many different problems at this stage.
You can open the page with router settings from any browser. It is enough to go to the addresstplinkwifi.net,or 192.168.0.1, and specify the factory username and password (admin and admin). The router's address, factory login information, and other information are listed on the bottom of the router, on a white sticker.

We will get access to the page with the settings of the router. The control panel may differ slightly. But it's okay, the sections with the settings are the same there. The web interface itself is in English. I think Russian language will appear in the next updates.

If for some reason you could not enter the control panel, then see the solutions in this article: https://help-wifi.com/oshibki-i-polomki/chto-delat-esli-ne-zaxodit-v- nastrojki-routera-na-192-168-0-1-ili-192-168-1-1 /. First of all, check if the automatic acquisition of an IP address is set in the properties of your connection. In the article at the link, I wrote about it.
Setting up an internet connection
Let's move on to the most important. We need to set the parameters so that the router can connect to the Internet. I'll write a few more words about how a router works. Most likely, you previously had the Internet connected directly to your computer. Now we connect the Internet to our TP-Link TL-WR845N. And if you used to run some kind of high-speed connection on your computer, now a router will do it. You just need to configure this connection. You no longer need an internet connection on your computer. You can delete it.
In the case when your provider uses the "Dynamic IP" connection type (for example, Kyivstar provider. Without binding by MAC address), the Internet should work automatically, without configuration. In order not to get confused, let's do this:
- If the Internet connection indicator on the TL-WR845N router lit orangethen most likely your ISP is using the PPPoE, L2TP, or PPTP connection type. Or you just need to clone the MAC address.
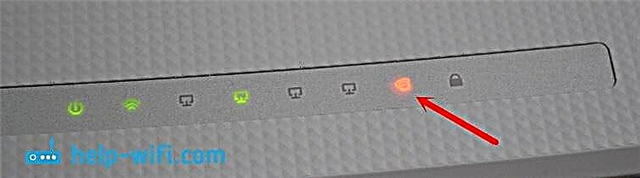 An orange indicator indicates that the router cannot connect to the Internet and distribute it. In this case, look at the article further and configure the connection.
 - If the indicator lit green, it means that the router is already connected to the Internet. You can skip this section and go straight to setting up your Wi-Fi network.
 An orange indicator indicates that the router cannot connect to the Internet and distribute it. In this case, look at the article further and configure the connection.
PPPoE, L2TP, PPTP setup
We have already figured out that there is no need to configure the "Dynamic IP" connection type. Unless you need to clone the IP address. I will write about this below. "Static IP" is rare.
You should have accurate information about the type of connection your ISP is using. Also, you must have the necessary parameters for connection. Usually, this is a username and password. All this information can be viewed in the connection agreement, or check with the provider's support.
In the settings go to the "Network" - "WAN" tab. In the drop-down menu "WAN Connection Type" you need to select the type of Internet connection. And already, depending on the selected type, set the necessary parameters.
For example, I chose PPPoE (Rostelecom, TTK, Dom.ru):
- We set the username (User Name).
- Set the password (Password). Twice.
- Check that the switch is next to "Connect Automatically" (connect automatically).
- You can click on the "Connect" button to test the connection to the provider.
- If everything is ok, then save the settings. "Save" button.

An example of setting up L2TP, or PPTP (for example, Billine provider):
- We select the appropriate connection type. I chose L2TP.
- We indicate the username.
- We specify the password.
- We put "Dynamic IP".
- We register the name, or the server address.
- Item "Connect Automatically".
- We save the settings.

The router should be connected to the Internet, and the indicator will turn green. If the connection indicator still glows orange, then make sure that you have selected the correct connection type and set all the parameters for the connection correctly.
Cloning a MAC address
Some providers bind the Internet to the MAC address. And if your Internet was tied to the computer to which the router is now connected, then you can try to clone the MAC from the computer. This can be done in the "Network" - "MAC Clone" tab. By clicking on the "Clone MAC Address" button.

You can also register the MAC address of the router with the provider (indicated on the router itself). Usually, this can be done through your personal account, or by telephone.
Proceed to the next settings only when the Internet connection indicator is green.
Setting up a Wi-Fi network. Setting Wi-Fi password
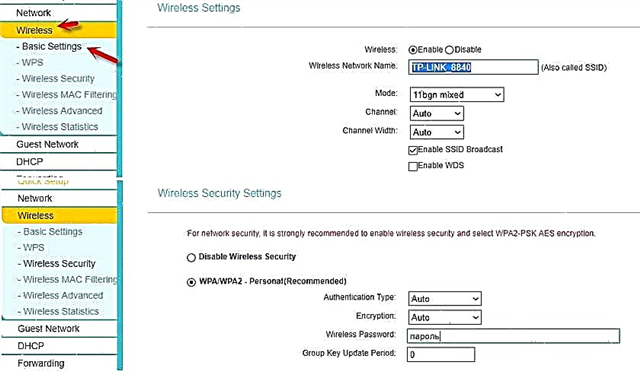
Let's move on to configuring the wireless network. All we need to do at this stage is to change the name of the Wi-Fi network (the standard one is somehow not very good), and change the password. To prevent an evil neighbor from connecting to our router 🙂
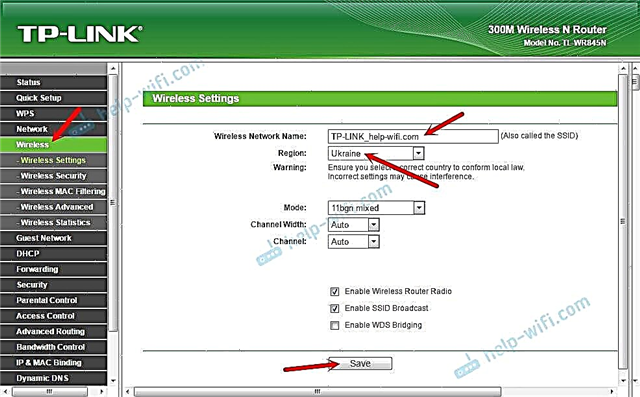
Open the "Wireless" tab. Here, in the "Wireless Network Name" field, we indicate the name of our Wi-Fi network (English letters, numbers). And below, we indicate our region. Don't change anything else, click on the "Save" button (if a message appears, click ok).

Then go to the "Wireless Security" tab. Here we will set the password for the Wi-Fi network.
The password must be entered in the "Wireless Password" field. The password must be at least 8 characters long. Don't forget to click on the "Save" button.

After changing the network name (SSID) and password, you will need to reconnect to the Wi-Fi network (if you configure the router when connecting via Wi-Fi). To connect, you will need to specify a new password. It is better to write down the password itself so as not to forget it.
Change of the factory password. Control panel protection
You already know that when entering the control panel of the router, you need to specify a username and password. By default, there are factory admin and admin. It is not very secure. Since everyone who connects to your router will be able to access its settings.
I advise you to change the admin password to something else. You can leave your username. Go to the settings in the "System Tools" - "Password" section.
There you need to specify the old username and password (in our case, admin). Then provide a new username (I left admin), and two times you need to specify a new password (New Password). This password will be used to log into the web-based interface of the router.

Just be sure to remember, or better yet, write down this password. If you forget it, then you cannot do without a full reset of the settings.
Setting up additional functions
We have completed all the necessary router settings. Now it works fine and distributes the Internet. Wi-Fi network is protected. Everything, you can use it.
I'll show you how to configure a few of the most popular features later. Which you might want to do on your TP-Link TL-WR845N.
Launching a guest network on TL-WR845N
I already wrote about setting up a guest network on TP-Link routers in a separate article. After configuring the guest Wi-Fi network, the router will distribute another wireless network. It can be made open, or you can put a password.
The guest network will be completely isolated from your main local network (this can be disabled). Also, for the guest network, you can configure the speed limit, or start this network by time.
In the settings, on the "Guest Network" tab, you can set all the necessary settings: the name of the guest network, the password, enable it (check the box next to the Guest Network item), enable speed limit, open access to the local network, or set up a scheduled launch.

Remember to save your settings. To disconnect the network, simply uncheck the "Guest Network" checkbox and re-save the settings.
Disable WPS
If you do not plan to use the WPS function, then it is better to disable it. There is information that this function makes the wireless network less secure and puts additional load on the router.
To disable, go to the "WPS" section, and click on the "Disable WPS" button.

If necessary, you can turn WPS back on without any problems.
Save the TL-WR845N parameters to a file
In conclusion, I want to advise you to save all the settings of the router to a file, and save this file on your computer. This will allow you to restore the settings from the file at any time if something happens to the router. Or, for example, after flashing. If the settings fail.
To do this, go to the "System Tools" - "Backup & Restore" section and click on the "Backup" button. Save the file to your computer in a safe place.

Now, at any time you can restore the settings from the file, according to this instruction.
Controlling the router from a smartphone or tablet
Once again, I would like to advise you to install the Tether application on your smartphone or tablet. With it, you can very easily manage the TP-Link TL-WR845N router. You can view the network map, see what devices are connected to the router, block access to the Internet for them, change the settings of the router.

Very cool app. And you don't need to log into the web interface through a browser every time.
If you still have questions about configuring this router, then ask them in the comments. I will definitely answer and try to help. Good luck!