If the TV does not have a built-in Miracast function, and we want to broadcast an image from a phone, tablet, or computer to the TV via Wi-Fi, then we need a Miracast adapter. The most popular are MiraScreen and AnyCast. What are these adapters and how they work, I told in this article. After purchasing such an adapter, you need to connect it to the TV and configure it. It is about setting that we will talk in this article. Most Miracast adapters can be configured via the web interface from any device (via a browser). You can go to the settings at 192.168.203.1. This can be done both from an Android phone or tablet, and from an iPhone, iPad, or any computer. For mobile devices, there are special applications through which you can configure the MiraScreen / AnyCast adapter. For example, connect to a Wi-Fi router. I will also tell you how to solve the problem when it does not go to 192.168.203.1 and MiraScreen settings do not open.
There are not many settings there, but they are useful and can come in handy. For example, in the Miracast adapter web interface, you can change the operating mode (Airplay / Miracast), connect the adapter to your router (to a Wi-Fi network), change the adapter Wi-Fi network password, language, image resolution, update the firmware, reboot the adapter , or reset to factory defaults. For normal and full-fledged operation of such an adapter, you need to at least go into its settings and connect it to the router. So that it can be accessed from all devices on the home network (which are connected to the same router).
I have a MiraScreen adapter. Probably one of the most popular. Let's look at the process of logging into the web interface and setting up using this adapter as an example. Before setting, you need to connect the adapter to your TV. The adapter itself is simply plugged into a free HDMI input on the TV. The USB cable, through which the adapter takes power, can be connected to the USB port on the TV (like mine), or to the outlet via the 5V / 1A adapter (with which you charge the phone).

If the TV does not display the image from the MiraScreen adapter, then make sure that the correct signal source is selected on the TV. You need to select the HDMI input to which we connected the device. There is usually a separate button on the remote control that opens the source selection menu. Most often it is signed as INPUT or SOURCES. The splash screen of our adapter should appear on the TV screen.
192.168.203.1: setting up MiraScreen adapter from Android or iPhone
First, I will show in my opinion the easiest way - setting through the web interface at 192.168.203.1. When the adapter is connected and turned on, it distributes a Wi-Fi network. The network name (SSID) and its password (PSK) are indicated on the splash screen that is displayed on the TV in standby mode. The adapter must be in (Airplay (DLNA)) mode.

On your phone or tablet, go to the Wi-Fi settings, select this network, enter the password and connect.
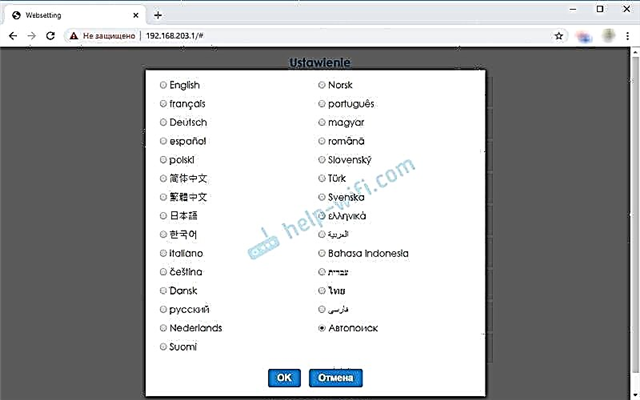
Then open any browser on the same device and go to the address 192.168.203.1... If it does not come in, we type it like this http://192.168.203.1/
A page with Miracast adapter settings should appear.

We'll look at the settings themselves in one of the following sections of this article.
Second option: through the app. There are different applications through which you can access the MiraScreen settings through your phone or tablet. Typically, after connecting the adapter to the TV, a QR code is displayed on the screen. This is the download link for the application. For my adapter, the app is called EZMira.
We turn on the camera on the phone and point it at the QR code on the TV screen. You should be prompted to follow the link - go. Perhaps the App Store or Google Play will open immediately. I opened a website in a browser, where I need to click on the Download button, and then go to the App Store or Google Play. Go ahead and install the application (I already have the EZMira application installed).

We connect our phone to the Wi-Fi network of the Miracast adapter (if it is not connected), launch the installed application, select the adapter and open the settings. The settings are the same as in the web version (via a browser). If you notice, the IP address 192.168.203.1 is listed under the adapter name.

The screenshot above shows how to connect a MiraScreen or AnyCast adapter to a Wi-Fi router (your network) via your phone.
Login to the web interface of the Miracast adapter through a computer
Everything is just as simple here. We connect the adapter and on the TV screen we see the SSID (network name) and PSK (password) of our adapter.

We connect the computer to this Wi-Fi network.

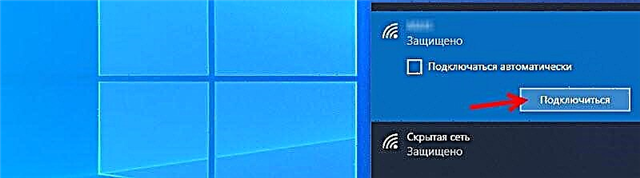
An important point! For some reason, Windows 10 immediately started asking for a PIN code instead of a password. And when I entered the PSK password, which is indicated on the TV screen, then a connection error appeared (Invalid PIN).
If you have the same situation, then click on "Connect using the security key" and enter the password.

Then the computer will connect to the adapter's wireless network. Next, open your browser and go to 192.168.203.1. Like this:

We got access to the page with the MiraScreen / AnyCast adapter settings. Below I will discuss these settings in more detail. Consider all the points and connect our Miracast adapter to your home Wi-Fi network.
MiraScreen / AnyCast settings and connecting the adapter to a Wi-Fi router
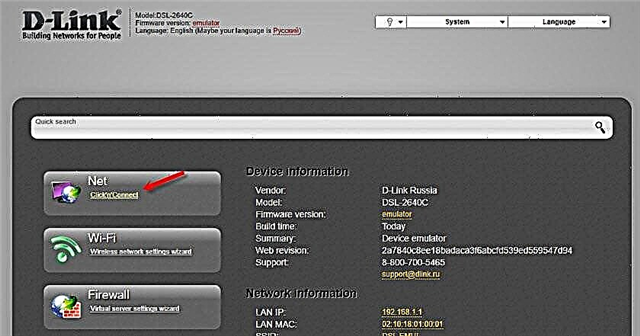
The first item of settings in the web interface is "The Internet" (Internet). This setting makes it possible connect MiraScreen adapter with router (if he is). This is necessary for broadcasting media content using DLNA technology and for Airplay to work (if there is no router, you can connect directly to the adapter's Wi-Fi network).
Click on "Internet". A list of available Wi-Fi networks will appear. We select our Wi-Fi network and enter the password for it.

You need to wait a bit. If we entered the password for the Wi-Fi network correctly and there are no problems on the side of the router, then the adapter will be connected to Wi-Fi. This can be seen from the icon on the TV screen.

The Miracast adapter is now on the local network. You no longer need to connect to his Wi-Fi network from the same iPhone to mirror the screen to the TV. You can be connected to the router's Wi-Fi network. This is one of the main settings.
Let's consider the rest of the settings:

- WI-FI Password - you can set a new password that will protect the Wi-Fi network broadcasted by the Miracast adapter.

Resolution - setting the image quality that will be broadcast via Miracast. In my case, there were three options: 1920x1080_60P, 720x480_60P, 1280x720_60P. If, for example, there is a long delay during broadcasting, and the sound lags behind, try lowering the resolution.

Language selection - you can change the language of the adapter web interface. There is a Russian language. The default is "Autosearch". The settings are almost all in Russian.
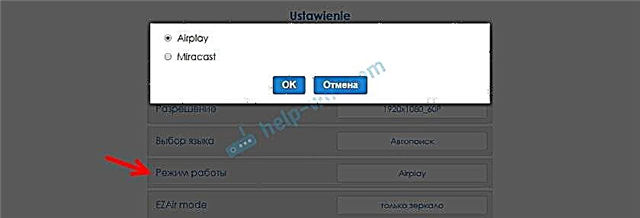
Mode of operation (Default Mode) - switching the operating mode of the MiraScreen adapter. There are usually two options: Airplay (mirroring the screen from iPhone, iPad, and computers on Mac OS, as well as DLNA operation) and Miracast - broadcasting images from devices on Android and Windows 10 via Miracast (Wireless display function in Windows 10).
 The operating mode can also be changed with a separate button on the adapter itself.
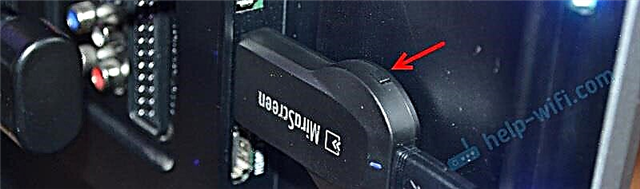 Also, the selected mode will change on the TV screen.
EZAir mode - the default is "mirror only". I do not recommend changing. The second option "Mirror + Stream" is similar for older versions of iOS.
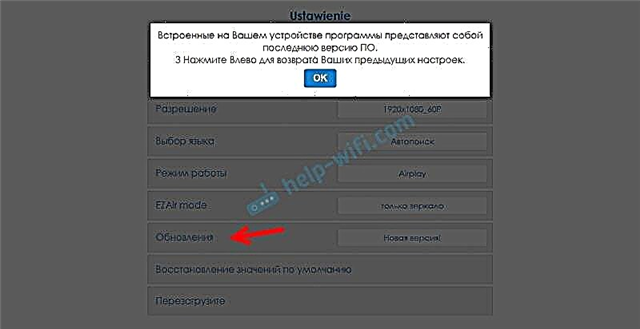
- Upgrade - updating the firmware of MiraScreen or AnyCast adapter. I understand that the adapter itself downloads the firmware (if there is a new version) and updates it.
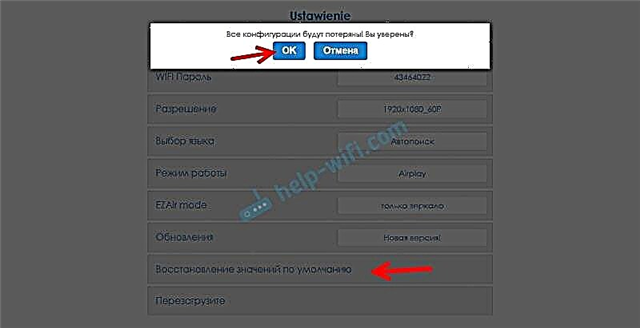
Reset to default - reset all adapter settings to factory values.
Reboot - Normal reboot of the adapter. It will shut off and back on. The whole fully loaded process takes 30 seconds (on my device).


 The operating mode can also be changed with a separate button on the adapter itself.
 Also, the selected mode will change on the TV screen.

Doesn't go to 192.168.203.1. What to do?
A very common problem when you do not enter the settings of the MiraScreen or AnyCast adapter. The page at 192.168.203.1 simply does not open and the settings are not available. Usually the error "Unable to access the site. Timed out waiting for a response from the site 192.168.203.1" appears.

Most often, the problem with entering the settings occurs for two reasons:
1The device from which the adapter's Miracast settings cannot be opened is not connected to the adapter's Wi-Fi network. Or connected not only to his network. For example, a laptop can be connected to the adapter via Wi-Fi and also to the router via cable. With such a connection, you will most likely not be able to access 192.168.203.1.Make sure your device (laptop, phone, tablet) is connected to the MiraScreen Wi-Fi network. I showed in detail how to make this connection in this article. Disable mobile internet on your phone.
2If MiraScreen / AnyCast adapter does not distribute Wi-Fi network, devices do not see the adapter's network, then it may be switched to Miracast mode. The adapter must be in Airplay mode.
You can change the operating mode with a button on the adapter itself (above in the article I showed how to do this). Or in the settings. But since it does not enter the settings at 192.168.203.1, this option does not suit us.
Other solutions:
- Try to log in via the address 192.168.49.1. Some Miracast adapters use this address. Mainly in Rombica Smart Cast devices.
- Be sure to try connecting to the adapter from another device and go into the settings via 192.168.203.1. Or through another browser.
- If VPN is enabled on the device in the browser, disable it.
- When you type the address 192.168.203.1 and instead of the MiraScreen settings, a search engine opens with search results, then most likely you are simply entering the address in the wrong line. The address must be entered into the address bar of the browser. You can type the full address: http://192.168.203.1/
- Turn off the power of the set-top box and turn it on again. Perhaps after rebooting the settings will open.
- Reset the adapter settings. Usually, you can reset the settings by holding the button for a long time (about 5-10 seconds), which is used to switch operating modes.
It seems that he showed everything, told, considered all the settings. If you have any questions, leave them in the comments. I think these will mainly be questions related to entering the Miracast adapter parameters. In this case, I immediately ask you to clarify which adapter you have. From which device the settings do not open, what problem / error and at what stage.