In the settings of any computer or laptop that runs on Windows, in the properties of the TCP / IPv4 protocol (version 4) of the network adapter, you can register static IP and DNS addresses. Simply put, in the properties of the Internet connection via a network cable (LAN), or in the properties of the wireless adapter (Wi-Fi). This is necessary in order to be able to manually register the necessary addresses for connecting to a modem, router, or provider's equipment in the event that a DHCP server does not work on these devices. If you are not in the subject, then the DHCP server is engaged in the automatic distribution of IP and DNS addresses.
Sometimes it really becomes necessary to specify static addresses in the properties of a network connection. For example, when the provider does not automatically distribute IP. How to do this, I wrote in the article How to register an IP address in Windows 7? We set the TCP / IP settings manually. But in most cases, the provider provides network settings automatically. And on all modems and routers, the DHCP server works by default. And this means that in order to connect to the Internet using a cable or Wi-Fi, in the settings of a specific network connection, in the properties of the IPv4 protocol, the parameters for automatically obtaining an IP address, subnet mask, gateway, and DNS addresses must be set.
If some addresses are registered there, and you are trying to connect to the router, then most likely you will encounter an IPv4 problem without access to the Internet / network, or without Internet access in Windows 7 and "Limited" in Windows 10. When connecting to the Internet via router, the computer should receive network addresses automatically. Otherwise, you will not be able to connect to the Wi-Fi network and the Internet will not work. And if you have just installed the router, then you will most likely not be able to go into its settings at 192.168.1.1, or 192.168.0.1.
Therefore, in case of any problems with connecting to the Internet, I always recommend that you first check the parameters for obtaining IP. Now I will show you how to check these settings in Windows 10 and Windows 7. For Windows 8, this instruction will also work.
Configuring automatic IP and DNS acquisition in Windows 10
We need to open the "Network Connections" window. There are many options. It is possible through the parameters, through the control panel, or through the "Run" window. Press the keyboard shortcut Win + R, copy the commandncpa.cpl and click Ok.

If you are connecting via cable, then right-click on the connection "Ethernet" and select "Properties". And if via Wi-Fi, then open the adapter properties "Wireless network".

Then, highlighting the item "IP version 4 (TCP / IPv4), you need to click on the" Properties "button, put the switches next to the items" Obtain an IP address automatically "and" Obtain DNS server address automatically "and click Ok (2 times).

Please note that the network settings of the network card (LAN) and wireless Wi-Fi adapter (if your computer has one) are changed separately.
Another option, maybe even more simple for someone - you can reset all network settings to factory settings. Follow the instructions: reset network settings in Windows 10. By default, addresses are assigned automatically.
Automatic network settings in Windows 7
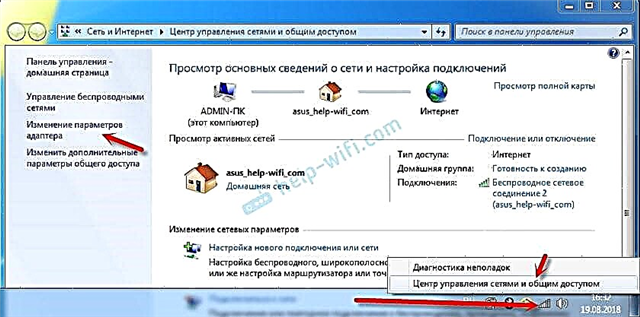
It's pretty much the same in Windows 7. You can also open "Network Connections" using the command through the "Run" window, or through the "Network and Sharing Center", which can be accessed by right-clicking on the connection icon in the tray. There you need to select "Change adapter settings".

Next, you need to open the "Properties" (by right-clicking) of the adapter, the parameters of which need to be changed. If the connection is by cable, then this "LAN connection", and if via Wi-Fi - "Wireless network connection".

Select "Internet Protocol Version 4 (TCP / IPv4)", click "Properties", set the automatic learning of IP addresses and DNS server addresses, and click Ok.

After completing these steps, the computer will receive the IP and DNS settings from the DHCP server of the router or provider.
In the same way, you can reset the network settings (including IP) using certain commands, which I wrote about in detail in the article Resetting TCP / IP and DNS Network Settings in Windows 7.