On a local network, you can not only exchange files, but also use printer sharing. A very useful function for both home and office. In this article, we will walk you through the process of setting up a network printer on a Windows 10 computer. I will show you the whole process: from changing the printer sharing settings to connecting a network printer on other computers on the local network. I have already checked everything on my equipment and took screenshots. I managed to configure everything, everything works fine, which means you will succeed.
But first, let's figure out how it works, how you can use this connection diagram, and what are the nuances. When you understand how something is arranged and works, it is much easier to configure it.
What is a network printer for and what is it?
As a rule, we have several computers, but there is only one printer, and it is connected to one computer. And to print from different computers or laptops, you need to connect to the printer directly (using a USB cable) each time, carry the printer, etc. This is very inconvenient. If all your computers are connected to the same network (to the same router, or switch), then they are in the same local network. You just need to change some of the sharing options in the Windows settings and all computers will be able not only to exchange files, but also to access the printer that is connected to one of the computers on the local network.
For example: our printer is connected to a PC, and the PC is connected to a router via a network cable, or via Wi-Fi. On this desktop computer, we set up the printer sharing. And you can send files for printing from all computers, laptops that are connected to the same router.
Note! This method of connection is relevant for those printers in which there is no possibility of direct connection to the router. Many modern printers support the remote printing function. This means that they can be directly connected to the router using a Wi-Fi network, or a network cable. Such a printer will be available in the same way from all devices on the local network. But we no longer need to configure a network printer on a specific computer. And we don't need to keep this computer always on for other devices to print. The printer works autonomously, is always on the local network and is ready to print from any device.
If the printer does not have network interfaces (LAN, Wi-Fi), then all that remains is to connect it to a computer and configure access via the local network. Previously in Windows 10, this could be done using the HomeGroup. But since it was removed in Windows 10 1803 and in new versions there is no such function as "Homegroup" anymore, you will have to configure it manually (without the setup wizard).
You can print to a printer connected to a computer on Windows 10 from other computers on the same dozen, Windows 8, Windows 8.1, Windows 7. But with Windows XP, problems may arise. But today this is no longer very relevant.
Setting up a network printer in Windows 10
Important! The printer itself must be connected to the computer and configured (drivers installed). The printer must be turned on.
Before setting up the printer, it is advisable to configure the sharing settings in Windows 10 according to this instruction: How to set up a local network in Windows 10? Sharing options and folder sharing in Windows 10. If you don't, then during the setup process we will also have to change the sharing options (I will show this).
Go to options, under Devices, on the Printers & Scanners tab. Our printer should be there. Click on it, then click on the "Manage" button.

Next, open "Printer Properties".

In the new window, go to the "Access" tab. We put a tick next to the item "Sharing this Printer"... If you want, you can change the "Resource Name" (printer). Click on the "Apply" button.

If Network Discovery and Sharing is enabled on your computer, you're done, the printer is already accessible from other computers on your home network.
Configuring Printer Sharing Settings
We have opened the general access to the printer. But if Windows 10 settings are disabled, other computers will not be able to access the printer. You need to check / configure the sharing settings.
You can open the settings we need through "Options" - "Network and Internet" - "Sharing Options". Or click on "Network and Sharing Center" in the "Access" window (with printer settings). And then go to "Change advanced sharing options".

In a new window on a tab "Private (current profile)" need to "Enable network discovery" and "Enable File and Printer Sharing".
Further, in the same window on the "All networks " need to "Disable password protected sharing" (if you trust computers on your network and do not want to enter an account password when accessing a network printer) and "Turn on sharing so network users ..." (this is kind of not necessary for the printer to work).

Access to the printer was opened, network discovery was enabled, and access from the network to the computer (to which the printer was connected) was also enabled. Everything is ready, you can connect this printer to other computers in the local network and print.
Connecting to a shared printer from Windows 10 computers
Since I checked everything on two computers with Windows 10 installed, we will consider the process of connecting to a network printer using this system as an example. I'll show you further on the example of Windows 7. In Windows 8, everything is about the same.
Open "Options" - "Devices" - "Printers and Scanners". Click on the "Add Printer or Scanner" button. As soon as the search starts, click on "The required printer is not in the list."

We put the switch next to "Select a shared printer by name" and click on the "Browse" button.

An explorer will open (Networking tab). If network discovery and sharing are not enabled on your computer, a corresponding notification will appear at the top. Click on it and select "Turn on network discovery and file sharing." And if another window appears, then select the item "No, make the network this computer is connected to private" in it.

Computers from the local network should appear. Open the computer on which the network printer was configured, select the printer and click on the "Select" button.

The printer is selected, click on the "Next" button.

We confirm the installation of the network printer driver.

After the installation is complete, you can simply click on the "Finish" button, or print a test page.

I printed a test page, everything works fine.

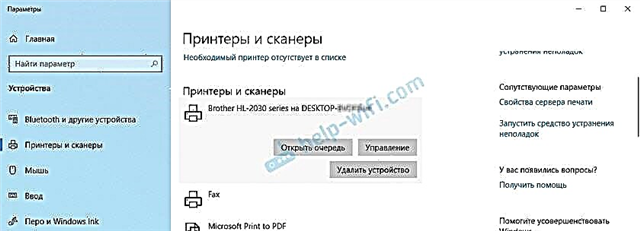
The network printer appears on the Printers & Scanners tab. There you can open the print queue, change the printer settings, or delete it from the system.

Everything is working!
Connecting to a printer in Windows 7 (8, 8.1)
Since you may have computers on the network on Windows 7, Windows 8, I will show you another way (universal, it also works in Windows 10), how you can quickly connect to a network printer.
Important! Network discovery must be enabled on the computer from which you want to connect to the shared printer. If it is disabled, then an offer will appear in the explorer to enable it (see below).
Open Windows Explorer and go to the "Network" tab. If network discovery and sharing is disabled (a message will appear), enable it (by right-clicking on the message).
Next, open the computer on which the printer is shared. Our printer should be displayed there. You need to either click on it twice with the left mouse button, or right-click and select "Connect".

Searching for and installing drivers for the printer starts. After successful installation, the printer will appear in the Devices and Printers control panel and can be used to print from any program. If you have any problems with installing drivers - pay attention to the recommendations below in this article.
The computer does not see the network printer, does not connect
From the side of the host computer (to which the printer is connected by cable) there are usually no problems. The main thing is that the drivers are installed, the system detects the printer and it is correctly configured according to the instructions above (the first part of the article).
But when connecting other computers to a shared printer, there are various problems and errors (0x00000002, 0x00000006, "access denied", the computer does not see the printer, etc.). Usually all these problems are associated with the sharing settings, printer drivers, or with a firewall (antivirus).
The computer does not see the printer on the local network
This problem is rare. Typically, the reason is that on the computer (or on both computers to which the printer is glued and from which you are trying to connect to it) network discovery and sharing is disabled. In this article, I have already written several times how and where to include all this. If your problem is precisely that the printer (or other computers from the local network) are not displayed on the network tab, then check the sharing settings on both computers.
I wrote more about this in the article shared folders, network computers, flash drives, drives are not displayed on the "Network" tab of Windows Explorer.
Also, temporarily stop the work of the antivirus, or the firewall built into it.
Error "Windows could not connect to the printer. Access denied"
This error looks something like this:

The error code can be different: 0x00000057, 0x00000002, 0x0000000a, 0x00000006, 0x00000214, 0x0000007e, etc. It usually appears at the stage of connecting and configuring a network printer.
Solutions:
- Checking the sharing options in the Windows 10 settings. I wrote about this above.
- Disable antivirus / firewall on the computer to which the printer is connected.
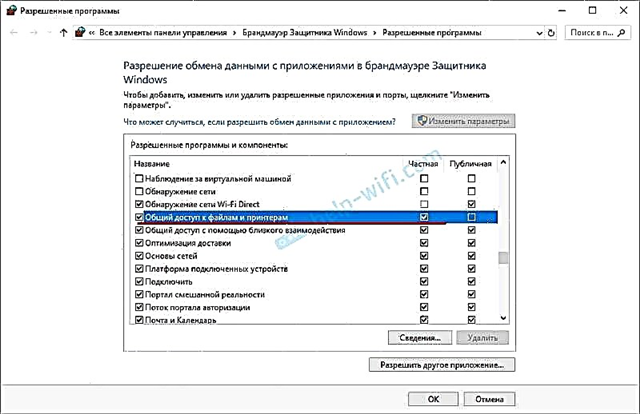
- We check the allowed programs in the firewall settings. There should be "File and Printer Sharing" enabled and there should be a checkmark next to "Private" (if you are using this profile).
 You can try to disable (uncheck) this item "File and Printer Sharing" altogether.
 - You can try to disable the digital signature verification of drivers.
- If your computer name is spelled out in Russian letters, change it in the system properties. Write down the computer name in English letters.
 You can try to disable (uncheck) this item "File and Printer Sharing" altogether.
Error "Failed to find driver"
Since when connected to this printer from other computers, drivers will be passed to them, there may be problems here. For example, on my computer Windows 10 64-bit. And the printer drivers are installed only for a 64-bit_ system. And if we want to connect a computer with Windows 32-bit (x86) to this network printer, then it simply will not be able to load the drivers and the printer will not work. The message "Failed to find driver" appears.
You need to add a driver for 32-bit systems. Or vice versa, it all depends on your hardware, system, installed drivers. You need to click on the "Additional Drivers" button (on the same "Access" tab) and check the box next to x86 (or x64). Then click "Ok", then "Browse" and specify the path to the folder with drivers for your printer for a 32-bit and / or 64-bit system. And again "Ok".

The system must load and save drivers for different versions of Windows (for 32-bit and 64-bit versions).